Building an Intelligent Chatbot with Spring AI and Milvus: A Hands-On Guide — new
Building an Intelligent Chatbot with Spring AI and Milvus: A Hands-On Guide
 AI generated Image
Spring AI is a powerful extension of the widely used Spring Framework, designed to simplify the development of AI-based applications. It provides seamless integration with various AI models and tools, leveraging the flexibility and scalability of the Spring ecosystem to build AI-driven solutions. Spring AI abstracts much of the complexity of deploying AI models, allowing developers to focus on building and scaling applications rather than worrying about infrastructure details.
Spring AI supports a variety of machine learning and AI workflows, from natural language processing (NLP) to image recognition, making it a versatile choice for a wide range of projects. With Spring’s robust support for dependency injection, configuration management, and scalability, Spring AI makes it easy to build production-ready AI applications.
Benefits of Using Spring AI
Seamless Integration with Spring Ecosystem: Spring AI integrates seamlessly with the larger Spring Framework, allowing you to take advantage of Spring Boot, Spring Cloud, and other Spring projects for easy deployment, scalability, and maintenance.
Modular and Flexible Architecture: Spring AI allows developers to choose the right AI models and frameworks without being locked into a specific technology. It provides flexibility in integrating popular AI and machine learning models with your application.
Enhanced Developer Productivity: Spring AI abstracts many of the complexities of working with AI models, enabling developers to quickly prototype and implement AI functionality without needing to deep dive into every technical detail of the underlying model.
Scalability: Since Spring AI leverages the core strengths of the Spring ecosystem, it provides out-of-the-box scalability features, making it easier to scale AI applications to handle larger volumes of data and traffic.
Easy Model Deployment: Spring AI simplifies the process of deploying AI models as services, enabling you to integrate them into real-time applications like chatbots, recommendation systems, and more.
Why I Chose Spring AI for This Project
For this chatbot project, Spring AI was an ideal choice because of its ability to quickly integrate AI-powered models into a Spring-based application. Since I was already familiar with the Spring Framework, using Spring AI allowed me to stay within the Spring ecosystem and leverage its powerful features, such as dependency injection and easy configuration management.
Moreover, the modular and flexible nature of Spring AI allowed me to experiment with different AI models and embeddings without being tied to a specific approach. The clean integration with Spring Boot also made it straightforward to manage and deploy the application, giving me more time to focus on building the core chatbot functionality rather than worrying about complex infrastructure or dependencies.
System Architecture Overview

Flow:
- The client application sends a query to the Spring AI backend.
- The Spring AI backend intercepts the request and sends the query to Milvus to retrieve relevant embeddings (context).
- Next, the query (along with the retrieved context) is sent to OpenAI’s LLM for processing.
- The OpenAI LLM generates a response and sends it back to the Spring AI backend.
- The Spring AI backend sends the processed response to the client application.
Step-by-Step implementation
Step 1: Setting Up Spring AI project
Generate a sample Spring project by including below dependencies -
- Azure OpenAI — Spring AI support for Azure’s OpenAI offering, powered by ChatGPT. It extends beyond traditional OpenAI capabilities, delivering AI-driven text generation with enhanced functionality. Click here
- Milvus Vector Database — Spring AI vector database support for Milvus. It is an open-source vector database that has garnered significant attention in the fields of data science and machine learning. One of its standout features lies in its robust support for vector indexing and querying. Click here
- Spring Web — Build web, including RESTful, applications using Spring MVC. Uses Apache Tomcat as the default embedded container. Click here

<dependencies>
        <dependency>
            <groupId>org.springframework.boot</groupId>
            <artifactId>spring-boot-starter-web</artifactId>
        </dependency>
        <dependency>
            <groupId>org.springframework.ai</groupId>
            <artifactId>spring-ai-starter-model-azure-openai</artifactId>
        </dependency>
        <dependency>
            <groupId>com.azure</groupId>
            <artifactId>azure-core</artifactId>
            <version>1.55.3</version>
        </dependency>

        <dependency>
            <groupId>com.azure</groupId>
            <artifactId>azure-core-http-netty</artifactId>
            <version>1.13.9</version>
        </dependency>
        <dependency>
            <groupId>io.milvus</groupId>
            <artifactId>milvus-sdk-java</artifactId>
            <version>2.2.0</version>
        </dependency>
        <dependency>
            <groupId>org.apache.poi</groupId>
            <artifactId>poi-ooxml</artifactId>
            <version>5.2.3</version>
        </dependency>
         <!-- gRPC dependencies -->
    <dependency>
        <groupId>io.grpc</groupId>
        <artifactId>grpc-netty-shaded</artifactId>
        <version>1.59.1</version>
    </dependency>
    <dependency>
        <groupId>io.grpc</groupId>
        <artifactId>grpc-protobuf</artifactId>
        <version>1.59.1</version>
    </dependency>
    <dependency>
        <groupId>io.grpc</groupId>
        <artifactId>grpc-stub</artifactId>
        <version>1.59.1</version>
    </dependency>
        <dependency>
            <groupId>org.springframework.boot</groupId>
            <artifactId>spring-boot-starter-test</artifactId>
            <scope>test</scope>
        </dependency>
    </dependencies>
Step 2: Setting Up Milvus as the Vector Database in local
- Make sure Docker is installed and running on your system. Install Docker
- Run the below command to pull latest milvus docker image -
docker pull milvusdb/milvus:latest
3. Milvus can be started or stopped from the docker start/stop control -

Step 3: Initialise the milvus DB
- Creates a new instance of the MilvusServiceClient using the connection parameters (connectParam).
- Assigns the newly created MilvusServiceClient instance to the milvusClient variable.
- Initialise the milvus connection (by default, milvus will be running in 19530 port)
import java.util.ArrayList;
import java.util.List;
import org.springframework.stereotype.Component;
import io.milvus.client.MilvusServiceClient;
import io.milvus.grpc.DataType;
import io.milvus.grpc.SearchResults;
import io.milvus.param.ConnectParam;
import io.milvus.param.IndexType;
import io.milvus.param.MetricType;
import io.milvus.param.R;
import io.milvus.param.RpcStatus;
import io.milvus.param.collection.CreateCollectionParam;
import io.milvus.param.collection.DropCollectionParam;
import io.milvus.param.collection.FieldType;
import io.milvus.param.collection.LoadCollectionParam;
import io.milvus.param.dml.InsertParam;
import io.milvus.param.dml.InsertParam.Field;
import io.milvus.param.dml.SearchParam;
import io.milvus.param.index.CreateIndexParam;
import io.milvus.response.SearchResultsWrapper;
import io.milvus.response.SearchResultsWrapper.IDScore;
private final String collectionName = "Xls_embeddings";
private static MilvusServiceClient milvusClient;
/**
 * Initializes the Milvus client connection.
 * This method establishes a connection to the Milvus server (a vector database)
 * using the provided host and port. If the `milvusClient` instance is null,
 * it creates and initializes a new client connection.
 *
 * Note: Replace the default host ("127.0.0.1") and port (19530) with the actual
 * values of your Milvus server configuration.
 */
public void initializeMilvus() {
    // Check if the Milvus client has not been initialized
    if (milvusClient == null) {
        // Create connection parameters for the Milvus server
        ConnectParam connectParam = ConnectParam.newBuilder()
                .withHost("127.0.0.1") // Replace with the hostname or IP address of your Milvus server
                .withPort(19530)       // Replace with the port number of your Milvus server
                .build();

        // Initialize the Milvus client with the connection parameters
        milvusClient = new MilvusServiceClient(connectParam);
    }
}
Step 4: Build and Configure an OpenAIClientBuilder with Custom Headers.
Follow these steps to create and configure an OpenAIClientBuilder with a gateway URL and custom headers:
- Begin by instantiating the OpenAIClientBuilder object.
- Set up a Reactor Netty HTTP Client to manage HTTP communication effectively.
- Ensure SSL (Secure Sockets Layer) is enabled to facilitate secure and encrypted communication with the server.
- Include any required custom HTTP headers for authentication or additional metadata.
- Use the configured Reactor Netty HTTP Client to create an Azure HTTP Client.
- Create HTTP Pipeline.
- Finally, attach the Azure HTTP Client to the OpenAIClientBuilder to complete the setup.
import java.io.File;
import java.io.FileInputStream;
import java.io.IOException;
import java.security.KeyStore;
import java.security.cert.CertificateFactory;
import java.security.cert.X509Certificate;
import java.util.ArrayList;
import java.util.HashMap;
import java.util.List;
import java.util.Map;
import java.util.stream.Collectors;
import javax.net.ssl.TrustManagerFactory;
import com.azure.ai.openai.OpenAIClientBuilder;
import com.azure.core.http.HttpClient;
import com.azure.core.http.HttpPipelineBuilder;
import com.azure.core.http.netty.NettyAsyncHttpClientBuilder;
import io.netty.handler.ssl.SslContext;
import io.netty.handler.ssl.SslContextBuilder;
import io.netty.handler.ssl.SslProvider;
import io.netty.handler.ssl.util.InsecureTrustManagerFactory;
/**
 * Creates and configures an `OpenAIClientBuilder` with custom HTTP client settings.
 *
 * This method performs the following steps:
 * 1. Sets up the OpenAI client builder with the specified endpoint (Gateway URL).
 * 2. Configures a Reactor Netty HTTP client for secure communication, including:
 *    - SSL context for HTTPS connections.
 *    - Custom headers for HTTP requests.
 * 3. Wraps the Reactor Netty HTTP client into an Azure-specific `NettyAsyncHttpClientBuilder`.
 * 4. Builds an `HttpPipeline` that attaches the configured HTTP client.
 * 5. Returns the fully configured `OpenAIClientBuilder`.
 *
 * @return A fully configured instance of `OpenAIClientBuilder`.
 */
public static OpenAIClientBuilder getBuilder() {
    // Step 1: Initialize the OpenAIClientBuilder with the specified endpoint
    OpenAIClientBuilder builder = new OpenAIClientBuilder()
            .endpoint("Gateway URL"); // Sets the endpoint (Gateway URL) for the OpenAI client. Replace with the actual URL.

    // Step 2: Configure a Reactor Netty HTTP client
    reactor.netty.http.client.HttpClient reactorHttpClient = reactor.netty.http.client.HttpClient.create()
            // Configure SSL for secure communication
            .secure(sslSpec -> {
                try {
                    // Create and set the SSL context for secure connections
                    sslSpec.sslContext(createSslContext());
                } catch (Exception e) {
                    // Handle potential exceptions during SSL context creation
                    e.printStackTrace();
                }
            })
            // Add custom headers to the HTTP requests
            .headers(headers -> {
                headers.add("customHeader1_key", "customHeader1_value"); // Example header 1
                headers.add("customHeader2_key", "customHeader2_value"); // Example header 2
                headers.add("customHeader3_key", "customHeader3_value"); // Example header 3
                headers.add("customHeader4_key", "customHeader4_value"); // Example header 4
                headers.add("customHeader5_key", "customHeader5_value"); // Example header 5
                headers.add("customHeader6_key", "customHeader6_value"); // Example header 6
            });

    // Step 3: Wrap the Reactor HTTP client into an Azure-specific HTTP client
    HttpClient azureHttpClient = new NettyAsyncHttpClientBuilder(reactorHttpClient).build();

    // Step 4: Build an HTTP pipeline to attach the custom HTTP client
    HttpClient httpClient = new HttpPipelineBuilder()
            .httpClient(azureHttpClient) // Attach the Azure-specific HTTP client
            .build()
            .getHttpClient();

    // Step 5: Attach the HTTP client to the OpenAIClientBuilder
    builder.httpClient(httpClient);

    // Step 6: Return the configured OpenAIClientBuilder
    return builder;
}

/**
 * Creates an SSL context for secure communication using a custom Certificate Authority (CA) certificate.
 *
 * The method performs the following steps:
 * 1. Loads the CA certificate from a specified path.
 * 2. Creates a KeyStore containing the trusted CA certificate.
 * 3. Initializes a TrustManagerFactory with the KeyStore.
 * 4. Builds and returns an SslContext configured for client use.
 *
 * Note: Replace "CERT PATH" with the actual path to the CA certificate file.
 *
 * @return an SslContext configured for secure communication.
 * @throws Exception if any step in the process fails (e.g., file not found, invalid certificate).
 */
public static SslContext createSslContext() throws Exception {
    // Step 1: Load the CA certificate
    CertificateFactory cf = CertificateFactory.getInstance("X.509"); // Create a CertificateFactory for X.509 certificates
    X509Certificate caCert;
    try (FileInputStream fis = new FileInputStream("CERT PATH")) { // Replace "CERT PATH" with the actual file path of the CA certificate
        caCert = (X509Certificate) cf.generateCertificate(fis); // Generate the CA certificate from the file
    }

    // Step 2: Create a KeyStore containing the trusted CA
    KeyStore keyStore = KeyStore.getInstance(KeyStore.getDefaultType()); // Create a new KeyStore instance for storing certificates
    keyStore.load(null, null); // Initialize the KeyStore with no password
    keyStore.setCertificateEntry("ca", caCert); // Add the CA certificate to the KeyStore with an alias "ca"

    // Step 3: Create a TrustManager that trusts the CA in the KeyStore
    TrustManagerFactory tmf = TrustManagerFactory.getInstance(TrustManagerFactory.getDefaultAlgorithm()); // Get the default TrustManagerFactory
    tmf.init(keyStore); // Initialize the TrustManagerFactory with the KeyStore

    // Step 4: Build and return the SSL context for client use
    return SslContextBuilder.forClient() // Create a new SSL context builder for client-side SSL
            .sslProvider(SslProvider.JDK) // Use the JDK SSL provider
            .trustManager(InsecureTrustManagerFactory.INSTANCE) // Use an insecure TrustManager for demonstration purposes
            .build(); // Build the SSL context
}
Step 5: Create an AzureOpenAiEmbeddingModel bean using OpenAIClientBuilder — this will be used to create embeddings.
import org.springframework.ai.azure.openai.AzureOpenAiChatModel;
import org.springframework.ai.azure.openai.AzureOpenAiChatOptions;
import org.springframework.ai.azure.openai.AzureOpenAiEmbeddingModel;
import org.springframework.context.annotation.Bean;
/**
 * Configures and provides a bean for the Azure OpenAI Embedding Model.
 *
 * This method creates an instance of the `AzureOpenAiEmbeddingModel`, sets its default deployment options,
 * and registers it as a Spring-managed bean. The model is used for generating embeddings, which are vector representations
 * of text, leveraging Azure OpenAI's embedding services.
 *
 * @return an initialized and configured instance of `AzureOpenAiEmbeddingModel`.
 */
@Bean
public AzureOpenAiEmbeddingModel azureOpenAiEmbeddingModel() {
    // Step 1: Create an instance of AzureOpenAiEmbeddingModel using a pre-configured builder
    // The builder is assumed to be configured in the previous step and provides the client connection
    AzureOpenAiEmbeddingModel model = new AzureOpenAiEmbeddingModel(<<Builder from previous step>>.buildClient());

    // Step 2: Set the default deployment name for the embedding model
    // Replace "text-embedding-3-large" with the name of your preferred embedding model deployment
    model.getDefaultOptions().setDeploymentName("text-embedding-3-large");

    // Step 3: Return the configured model as a Spring-managed bean
    return model;
}
Step 6: Generating and Storing embeddings in Milvus DB
In this step, we will generate embeddings for your content using an embedding model and store them in the Milvus database. This example demonstrates the process using a REST API to create embeddings and save them effectively. Follow the steps below:
- Process the content file. In this example, we are using an Excel file containing two columns: “Question” and “Answer”.
- Extract the list of questions from the file. Send these questions to the embedding model to generate vector embeddings.
- Insert the generated embeddings along with their corresponding answers into the Milvus database for efficient retrieval and query processing.
import java.io.File;
import java.io.FileInputStream;
import java.io.IOException;
import java.security.KeyStore;
import java.security.cert.CertificateFactory;
import java.security.cert.X509Certificate;
import java.util.ArrayList;
import java.util.HashMap;
import java.util.List;
import java.util.Map;
import java.util.stream.Collectors;
import javax.net.ssl.TrustManagerFactory;
import org.apache.poi.xwpf.usermodel.XWPFDocument;
import org.apache.poi.xwpf.usermodel.XWPFParagraph;
import org.apache.poi.ss.usermodel.*;
import org.apache.poi.xssf.usermodel.XSSFWorkbook;
import com.azure.ai.openai.OpenAIClientBuilder;
import com.azure.core.http.HttpClient;
import com.azure.core.http.HttpPipelineBuilder;
import com.azure.core.http.netty.NettyAsyncHttpClientBuilder;
import io.netty.handler.ssl.SslContext;
import io.netty.handler.ssl.SslContextBuilder;
import io.netty.handler.ssl.SslProvider;
import io.netty.handler.ssl.util.InsecureTrustManagerFactory;
@Autowired
private AzureOpenAiEmbeddingModel embedModel;

/**
 * Processes an Excel sheet to extract questions and answers.
 *
 * This method reads data from the first sheet of an Excel file and organizes it into two lists:
 * one for questions and one for answers. Each row of the Excel sheet is expected to have
 * the question in the first cell and the answer in the second cell. The processed data is
 * returned as a map with two keys: "question" and "answer".
 *
 * @return a map containing two lists:
 *         - "question": A list of questions extracted from the Excel sheet.
 *         - "answer": A list of answers corresponding to the questions.
 * @throws RuntimeException if an I/O error occurs while reading the Excel file.
 */
public Map<String, List<String>> processExcelSheet() {
    // Initialize lists to store questions and answers
    List<String> questions = new ArrayList<>();
    List<String> answers = new ArrayList<>();

    // Map to store processed data
    Map<String, List<String>> processedData = new HashMap<>();

    // Try-with-resources block to ensure resources are closed after use
    try (FileInputStream fis = new FileInputStream(new File("Excel file path")); // Replace "Excel file path" with the actual path to the Excel file
         Workbook workbook = new XSSFWorkbook(fis)) { // Create a workbook instance for the Excel file

        // Get the first sheet of the workbook (index 0)
        Sheet sheet = workbook.getSheetAt(0);

        // Iterate through each row of the sheet
        for (Row row : sheet) {
            int i = 0; // Initialize column index
            // Iterate through each cell in the row
            for (Cell cell : row) {
                if (i == 0) {
                    // Add the value of the first column (question) to the questions list
                    questions.add(cell.getStringCellValue());
                } else {
                    // Add the value of the second column (answer) to the answers list
                    answers.add(cell.getStringCellValue());
                }
                i++; // Increment the column index
            }
        }
    } catch (IOException e) {
        // Catch and print any I/O exceptions that occur during file reading
        e.printStackTrace();
    }

    // Add the lists of questions and answers to the map
    processedData.put("question", questions);
    processedData.put("answer", answers);

    // Return the processed map
    return processedData;
}

/**
 * Inserts embeddings and their associated tokens into a Milvus collection.
 *
 * The method performs the following steps:
 * 1. Prepares the data to be inserted, including embeddings and tokens.
 * 2. Drops the collection if it already exists.
 * 3. Defines a schema for the collection, including fields for embeddings and tokens.
 * 4. Creates a new Milvus collection with the defined schema.
 * 5. Creates an index on the vector field for efficient similarity searches.
 * 6. Inserts the embeddings and tokens into the collection.
 *
 * @param embeddingsList A list of embeddings (each embedding is a list of floats).
 * @param tokens A list of tokens corresponding to the embeddings.
 */
public void insertEmbeddingsToMilvus(List<List<Float>> embeddingsList, List<String> tokens) {
    // Step 1: Prepare data for insertion
    List<Field> allFields = new ArrayList<>();
    allFields.add(new Field("vector_field", embeddingsList)); // Add the vector embeddings to the "vector_field"
    allFields.add(new Field("description", tokens));         // Add the tokens to the "description" field

    // Create an InsertParam object with the collection name and fields
    InsertParam insertParam = InsertParam.newBuilder()
            .withCollectionName(collectionName)
            .withFields(allFields)
            .build();

    // Step 2: Drop the collection if it exists
    try {
        // Attempt to drop the existing collection
        milvusClient.dropCollection(DropCollectionParam.newBuilder()
                .withCollectionName(collectionName)
                .build());

        System.out.println("Collection '" + collectionName + "' deleted successfully.");
    } catch (Exception e) {
        // Handle cases where the collection does not exist or other errors occur
        System.err.println("Failed to delete collection: " + e.getMessage());
    }

    // Step 3: Define the schema for the collection
    List<FieldType> fields = new ArrayList<>();
    fields.add(FieldType.newBuilder()
            .withName("id") // Primary key field
            .withDescription("Primary key")
            .withDataType(DataType.Int64)
            .withPrimaryKey(true)
            .withAutoID(true) // Auto-generate IDs for this field
            .build());
    fields.add(FieldType.newBuilder()
            .withName("description") // Field for tokens
            .withDescription("tokens")
            .withDataType(DataType.VarChar)
            .withMaxLength(2000) // Maximum length for the tokens
            .build());
    fields.add(FieldType.newBuilder()
            .withName("vector_field") // Field for vector embeddings
            .withDescription("Vector embeddings")
            .withDataType(DataType.FloatVector)
            .withDimension(embeddingsList.get(0).size()) // Set the dimension based on the first embedding's size
            .build());

    // Step 4: Create the collection with the defined schema
    CreateCollectionParam createCollectionParam = CreateCollectionParam.newBuilder()
            .withCollectionName(collectionName)
            .withDescription("Collection for storing given embeddings")
            .withFieldTypes(fields)
            .build();
    milvusClient.createCollection(createCollectionParam);
    // Step 5: Create an index on the vector field
    R<RpcStatus> response = milvusClient.createIndex(CreateIndexParam.newBuilder()
            .withCollectionName(collectionName)
            .withFieldName("vector_field")
            .withIndexType(IndexType.IVF_FLAT) // Use IVF_FLAT index type for the vector field
            .withMetricType(MetricType.L2)    // Metric type for similarity search (e.g., L2, IP, COSINE)
            .build());
    System.out.println(response.getStatus()); // Print the status of the index creation
    // Step 6: Insert data into the collection
    milvusClient.insert(insertParam);
}


/**
 * REST API endpoint to process an Excel sheet, generate embeddings for the data, and insert the results into Milvus.
 *
 * This method performs the following steps:
 * 1. Reads an Excel sheet to extract data (questions and answers).
 * 2. Generates embeddings for the extracted questions using an embedding model.
 * 3. Initializes a Milvus client for database operations.
 * 4. Inserts the generated embeddings and their corresponding answers into a Milvus collection.
 *
 * @return A success message with the count of embeddings inserted into the database.
 */
@GetMapping(value = "/embedding_xls", produces = MediaType.APPLICATION_JSON_VALUE)
public String embedding_xls() {
    // Step 1: Initialize the embeddings list
    List<List<Float>> embeddingsList = new ArrayList<>();

    // Step 2: Process the Excel sheet to extract questions and answers
    Map<String, List<String>> processedData = processExcelSheet();
    List<String> allToken = processedData.get("question"); // Extract the list of questions

    // Step 3: Generate embeddings for the questions
    EmbeddingResponse embeddingResponse = embedModel.embedForResponse(allToken); // Generate embeddings using the model
    List<Embedding> allEmbeddings = embeddingResponse.getResults();

    // Step 4: Convert each embedding's output to a list of floats
    for (Embedding embedding : allEmbeddings) {
        List<Float> result = new ArrayList<>(embedding.getOutput().length);
        for (float f : embedding.getOutput()) {
            result.add(f);
        }
        embeddingsList.add(result); // Add each embedding to the embeddings list
    }

    // Step 5: Initialize the Milvus client
    intializeMilvus();

    // Step 6: Insert the embeddings and corresponding answers into Milvus
    insertEmbeddingsToMilvus(embeddingsList, processedData.get("answer"));

    // Step 7: Return a success message with the count of inserted embeddings
    return "Successfully inserted : " + embeddingsList.size();
}
Step 7: Create a AzureOpenAiChatModel bean using OpenAIClientBuilder
/**
 * Configures and provides a Spring-managed bean for the Azure OpenAI Chat Model.
 *
 * This method creates an instance of the `AzureOpenAiChatModel` with the following configuration:
 * 1. Utilizes a custom OpenAI client builder for connecting to Azure OpenAI services.
 * 2. Sets default options for the chat model, including deployment name, maximum tokens, and temperature.
 * 3. Registers the configured `AzureOpenAiChatModel` instance as a Spring-managed bean.
 *
 * @return an initialized and configured instance of `AzureOpenAiChatModel`.
 */
@Bean
public AzureOpenAiChatModel azureOpenAiChatModel() {
    return AzureOpenAiChatModel.builder()
            // Step 1: Set the OpenAI client builder
            .openAIClientBuilder(CommonUtil.getBuilder()) // Retrieves a pre-configured OpenAI client builder

            // Step 2: Configure default options for the chat model
            .defaultOptions(AzureOpenAiChatOptions.builder()
                    .deploymentName("gpt-4o") // Specify the deployment name for the model (e.g., "gpt-4o")
                    .maxTokens(1000)         // Set the maximum number of tokens for responses
                    .temperature(0.1)       // Set the temperature for response creativity (lower values = more deterministic)
                    .build())

            // Step 3: Build the Azure OpenAI Chat Model instance
            .build();
}
Step 8: Initiating a Chat Using AzureOpenAiChatModel. The following steps outline the chat process leveraging the AzureOpenAiChatModel:
- Capture User Input: Retrieve the user’s input from the UI chat interface.
- Generate Embeddings: Use the AzureOpenAiEmbeddingModel object to create embeddings for the user input.
- Search in Milvus Database: Query the Milvus database using the generated embeddings to find the top matching results.
- Analyze Search Results: Extract the results from Milvus, which include similarity scores for the matched entries.
- Prepare and Interact with LLM: Construct a UserMessage using the user prompt and the retrieved information. Send this message to the Large Language Model (LLM) for an enhanced and contextually refined response.
import java.util.ArrayList;
import java.util.List;
import java.util.Map;
import org.springframework.ai.azure.openai.AzureOpenAiChatModel;
import org.springframework.ai.azure.openai.AzureOpenAiEmbeddingModel;
import org.springframework.beans.factory.annotation.Autowired;
import org.springframework.http.MediaType;
import org.springframework.web.bind.annotation.GetMapping;
import org.springframework.web.bind.annotation.RequestParam;
import org.springframework.web.bind.annotation.RestController;
import org.springframework.ai.chat.messages.SystemMessage;
import org.springframework.ai.chat.messages.UserMessage;
import org.springframework.ai.chat.model.ChatResponse;
import org.springframework.ai.chat.prompt.Prompt;
import org.springframework.ai.embedding.Embedding;
import org.springframework.ai.embedding.EmbeddingResponse;
@Autowired
private AzureOpenAiChatModel chatModel;
@Autowired
private AzureOpenAiEmbeddingModel embedModel;
/**
 * REST API endpoint to process a query, search for relevant embeddings, and generate a chat response.
 *
 * This method performs the following steps:
 * 1. Generates an embedding for the user-provided query text using an embedding model.
 * 2. Searches the Milvus database for embeddings similar to the query embedding.
 * 3. Constructs a chat prompt using the search results and a system message.
 * 4. Sends the prompt to the chat model to generate a reply.
 * 5. Returns the AI-generated response as a JSON string.
 *
 * @param queryText The user-provided query text for which a response is generated.
 * @return A JSON string containing the AI-generated response.
 */
@GetMapping(value = "/getChatResponse", produces = MediaType.APPLICATION_JSON_VALUE)
public String getChatReply(@RequestParam("text") String queryText) {
    // Step 1: Generate an embedding for the query text
    EmbeddingResponse embeddingResponse = embedModel.embedForResponse(List.of(queryText)); // Generate embedding
    float[] embedding = embeddingResponse.getResult().getOutput(); // Retrieve embedding as a float array

    // Convert the embedding float array into a List<Float>
    List<Float> result = new ArrayList<>(embedding.length);
    for (float f : embedding) {
        result.add(f);
    }

    // Step 2: Initialize the Milvus client
    milvusUtil.intializeMilvus();

    // Step 3: Search for similar embeddings in the Milvus database
    String userMessageStr = searchEmbeddingsInMilvus(result, 4); // Retrieve top 4 matches from Milvus

    // Step 4: Construct the chat prompt
    UserMessage userMessage = new UserMessage(userMessageStr); // Create a UserMessage with the search results
    SystemMessage systemMessage = new SystemMessage("You are an AI assistant."); // Provide a system message
    Prompt prompt = new Prompt(List.of(userMessage, systemMessage)); // Combine the messages into a Prompt object

    // Step 5: Send the prompt to the chat model and retrieve the response
    ChatResponse response = this.chatModel.call(prompt); // Generate the chat model's response
    String res = response.getResult().getOutput().getText(); // Extract the text content from the response

    // Step 6: Return the AI-generated response
    return res;
}

/**
 * Searches for similar embeddings in a Milvus collection and retrieves the top matches.
 *
 * This method performs the following steps:
 * 1. Configures the search parameters for querying Milvus (e.g., collection name, query embeddings, metric type).
 * 2. Loads the specified collection into memory for querying.
 * 3. Executes the search query in Milvus and retrieves the results.
 * 4. Extracts descriptions and similarity scores from the search results.
 * 5. Formats the results into a readable string containing the top matches and their scores.
 *
 * @param queryEmbeddings A list of floats representing the query embedding vector.
 * @param topK The number of top matches to retrieve from Milvus.
 * @return A formatted string containing the top matches and their similarity scores, along with a prompt for analysis.
 */
public String searchEmbeddingsInMilvus(List<Float> queryEmbeddings, int topK) {
    // Step 1: Configure the search parameters
    SearchParam searchParam = SearchParam.newBuilder()
            .withCollectionName(collectionName)     // Specify the collection name in Milvus
            .withVectors(List.of(queryEmbeddings))  // Provide the query embeddings as input
            .withVectorFieldName("vector_field")    // Specify the vector field name in the collection
            .withMetricType(MetricType.L2)          // Use L2 (Euclidean distance) as the similarity metric
            .withTopK(topK)                         // Specify the number of top matches to retrieve
            .addOutField("description")             // Include the "description" field in the output
            .build();

    // Step 2: Load the collection into memory to prepare it for querying
    R<RpcStatus> loadStatus = milvusClient.loadCollection(
            LoadCollectionParam.newBuilder()
                    .withCollectionName(collectionName) // Load the specified collection
                    .build()
    );
    System.out.println(loadStatus.getStatus()); // Print the status of the load operation

    // Step 3: Perform the search query in Milvus
    R<SearchResults> response = milvusClient.search(searchParam);
    SearchResults searchResults = response.getData();

    // Step 4: Wrap the search results for easy access to fields and scores
    SearchResultsWrapper resultsWrapper = new SearchResultsWrapper(searchResults.getResults());

    // Extract the descriptions of the matches from the "description" field
    List<String> descriptionList = (List<String>) resultsWrapper.getFieldData("description", 0);

    // Extract the similarity scores for the matches
    List<IDScore> idScoreList = resultsWrapper.getIDScore(0);

    // Step 5: Format the results into a readable string
    StringBuilder builder = new StringBuilder();
    int count = 0;
    for (IDScore idScore : idScoreList) {
        builder.append(String.format("%s, Score: %.4f",
                descriptionList.get(count++),       // Retrieve the description for the current result
                idScore.getScore()                  // Retrieve the similarity score
        ));
        builder.append("\n");
    }

    // Print the list of descriptions for debugging purposes
    System.out.println(descriptionList);

    // Return the formatted string containing the search results and a prompt for analysis
    return String.format(
            "Based on the search results, the top matches are:\n%s\n\n" +
                    "Can you analyze and provide meaningful insights?",
            builder.toString()
    );
}
Step 9: Render the response in chat UI -
<!DOCTYPE html>
<html lang="en">

<head>
    <meta charset="UTF-8">
    <meta name="viewport" content="width=device-width, initial-scale=1.0">
    <title>Full-Screen Chat</title>
    <style>
        * {
            margin: 0;
            padding: 0;
            box-sizing: border-box;
        }

        body {
            font-family: Arial, sans-serif;
            height: 100vh;
            display: flex;
            justify-content: center;
            align-items: center;
            background-color: #f4f4f9;
        }

        #chat-container {
            width: 100%;
            height: 100%;
            display: flex;
            flex-direction: column;
            background: #ffffff;
        }

        #chat-header {
            padding: 15px;
            background-color: #007bff;
            color: white;
            text-align: center;
            font-size: 18px;
            font-weight: bold;
        }

        #chat-messages {
            flex: 1;
            padding: 10px;
            overflow-y: auto;
            border-top: 1px solid #ddd;
            border-bottom: 1px solid #ddd;
        }

        .message-container {
            display: flex;
            align-items: flex-start;
            margin-bottom: 10px;
        }

        .message-container.user {
            justify-content: flex-end;
        }

        .message-container.bot {
            justify-content: flex-start;
        }

        .avatar {
            width: 40px;
            height: 40px;
            border-radius: 50%;
            background-color: #ddd;
            display: flex;
            justify-content: center;
            align-items: center;
            font-weight: bold;
            color: white;
            margin: 0 10px;
        }

        .avatar.user {
            background-color: #007bff;
        }

        .avatar.bot {
            background-color: #ff5c5c;
        }

        .message {
            max-width: 70%;
            padding: 10px;
            border-radius: 10px;
            font-size: 14px;
            line-height: 1.5;
        }

        .message.user {
            background: #e9f5ff;
            color: #007bff;
            border-radius: 10px 10px 0 10px;
        }

        .message.bot {
            background: #007bff;
            color: white;
            border-radius: 10px 10px 10px 0;
        }

        #chat-input {
            display: flex;
            padding: 10px;
            background-color: #f9f9f9;
            border-top: 1px solid #ddd;
        }

        #chat-input input {
            flex: 1;
            border: 1px solid #ddd;
            border-radius: 4px;
            padding: 10px;
            font-size: 16px;
        }

        #chat-input button {
            margin-left: 10px;
            background-color: #007bff;
            color: #fff;
            border: none;
            border-radius: 4px;
            padding: 10px 15px;
            font-size: 16px;
            cursor: pointer;
        }

        #chat-input button:hover {
            background-color: #0056b3;
        }
    </style>
</head>

<body>
    <div id="chat-container">
        <div id="chat-header">DCSP bot</div>
        <div id="chat-messages"></div>
        <div id="chat-input">
            <input type="text" id="message-input" placeholder="Type your message..." />
            <button id="send-button">Send</button>
        </div>
    </div>

    <script>
        const chatMessages = document.getElementById('chat-messages');
        const messageInput = document.getElementById('message-input');
        const sendButton = document.getElementById('send-button');

        // Function to format the response before rendering
        function formatResponse(content) {
            // Example: Parse JSON and format it with indentation
            try {
                const jsonObject = JSON.parse(content); // Parse JSON string into an object
                return JSON.stringify(jsonObject, null, 2) // Format JSON with 2 spaces for indentation
                    .replace(/ /g, ' ') // Replace spaces with HTML non-breaking spaces
                    .replace(/\n/g, '<br>'); // Replace newlines with <br> for HTML rendering
            } catch (error) {
                // If content is not JSON, return as-is
                return content
                    .replace(/\n/g, '<br>') // Replace newlines with <br>
                    .trim(); // Remove extra whitespace
            }
        }

        // Function to append messages to the chat
        function appendMessage(content, type, tempId = null) {
            const containerDiv = document.createElement('div');
            containerDiv.classList.add('message-container', type);

            if (tempId) containerDiv.id = tempId; // Assign an ID for later replacement

            const avatarDiv = document.createElement('div');
            avatarDiv.classList.add('avatar', type);
            avatarDiv.textContent = type === 'user' ? 'U' : 'B'; // "U" for User, "B" for Bot

            const messageDiv = document.createElement('div');
            messageDiv.classList.add('message', type);
            messageDiv.innerHTML = content;

            containerDiv.appendChild(type === 'user' ? messageDiv : avatarDiv);
            containerDiv.appendChild(type === 'user' ? avatarDiv : messageDiv);

            chatMessages.appendChild(containerDiv);
            chatMessages.scrollTop = chatMessages.scrollHeight; // Auto-scroll to the bottom
        }
        function updateMessage(tempId, content) {
            const containerDiv = document.getElementById(tempId);
            if (containerDiv) {
                const messageDiv = containerDiv.querySelector('.message');
                if (messageDiv) {
                    messageDiv.innerHTML = content;
                }
            }
        }

        // Function to handle sending messages
        async function sendMessage() {
            const userMessage = messageInput.value.trim();
            if (!userMessage) return;

            appendMessage(userMessage, 'user'); // Display user's message
            messageInput.value = ''; // Clear input field

            const tempId = `temp-${Date.now()}`;
            appendMessage('<span class="typing-indicator">Planning response...</span>', 'bot', tempId);

            try {
                // Call the GET API to fetch the bot's response
                const response = await fetch(`http://localhost:8080/getChatResponse?text=${encodeURIComponent(userMessage)}`);
                if (!response.ok) throw new Error('Failed to fetch response');

                const data = await response.json();
                const formattedResponse = formatResponse(data.response);
                updateMessage(tempId, formattedResponse);
            } catch (error) {
                updateMessage(tempId, 'Error: Unable to connect to server');
            }
        }

        // Add event listeners for send button and Enter key
        sendButton.addEventListener('click', sendMessage);
        messageInput.addEventListener('keypress', (event) => {
            if (event.key === 'Enter') sendMessage();
        });
    </script>
</body>

</html>
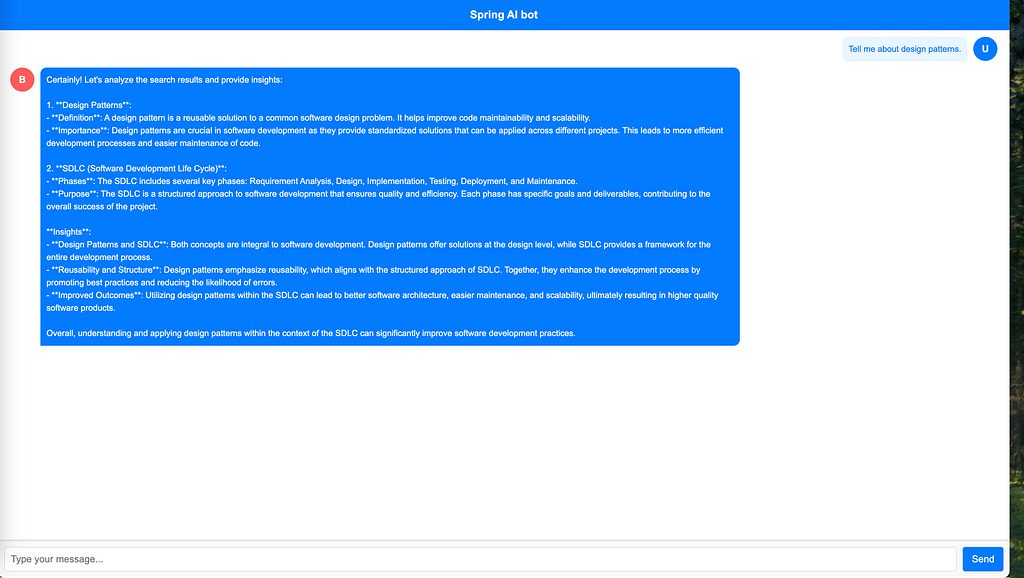
Step 9: Chat output
In this blog, we explore the process of creating an intelligent chatbot by leveraging the power of Spring AI and Milvus, a vector database for similarity search. The guide walks you through a hands-on approach to building a scalable, efficient, and intelligent chatbot capable of understanding and responding to user queries with context-aware insights.
Key Highlights:
- Integration with Spring AI: Learn how to configure and use Spring AI for embedding generation and conversational AI capabilities.
- Milvus for Vector Search: Discover how Milvus enables similarity-based searches by storing and retrieving vector embeddings efficiently.
- End-to-End Implementation: From embedding generation to Milvus integration and chatbot response handling, the blog provides a step-by-step guide to building the entire system.
Whether you’re a developer looking to enhance your chatbot’s intelligence or someone curious about integrating vector search with conversational AI, this guide provides practical insights and actionable steps to help you get started.
Building an Intelligent Chatbot with Spring AI and Milvus: A Hands-On Guide — new was originally published in Walmart Global Tech Blog on Medium, where people are continuing the conversation by highlighting and responding to this story.
Introduction to Malware Binary Triage (IMBT) Course
Looking to level up your skills? Get 10% off using coupon code: MWNEWS10 for any flavor.
Enroll Now and Save 10%: Coupon Code MWNEWS10
Note: Affiliate link – your enrollment helps support this platform at no extra cost to you.
1 post - 1 participant
Malware Analysis, News and Indicators - Latest topics

Sp123
"An underestimated security threat to organizations is employee apathy and burn out."
